DCML annotation workflow
Note
It is of utmost importance that annotators have a basic understanding of version control and branching via Git before they get familiar with the DCML annotation workflow. Our Quick reference contains the bare minimum of what annotators need to know, but if you’re completely new to Git, please make sure to read, watch, or do a couple of tutorials online.
Summary of workflow update December 2022
Before annotating or upgrading a piece, the assignee adds an invisible metronome marking to the first bar.
Annotation/Upgrade and Review take place in the same Pull Request (no prior merging into
main!)._reviewedfiles now to be found in thereviewedfolder. A couple of things are new:The red and green labels now reflect the changes between the current set of labels and the previous bot commit, i.e. since the last time someone pushed changes to the MuseScore file in question.
The
_reviewedfiles show all out-of-label notes in red.The
reviewedfolder additionally contains TSV files that reflect the note coloring
When the bot checks the modified scores and encounters any warnings (including those concerning mismatches between labels and scores) it will write them into the
warnings.logfile for you to look them up. It’s commit message will end on(tests failed).Everytime a Pull Request is merged, the bot will perform the review on all scores. That is to say, the
warnings.logfile on themainbranch shows all remaining errors.Sometimes, warnings that cause the tests to fail are due to irregularities in the original scores. To make the test pass anyway, we add the warning to an IGNORED_WARNINGS file, potentially with a comment for other humans.
Short summary
Annotator:
creates a new branch (splitting off of the main branch!) named after the file to be annotated
pushes annotations and corrects errors that were automatically detected on GitHub,
creates Pull Request (PR)
Reviewer:
reviews the annotations and commits every change separately into the open PR
approves the changes on GitHub, enabling the annotator to agree and merge
Annotator:
Pulls the changes and goes through reviewer’s commits in the PR
in case of disagreement, enters into discussion with reviewer until consensus is reached
merges PR as soon as both parties agree on a set of labels.
More details can be found below.
Annotating
- Head to your local clone of the repository in which you want to annotate a piece and update the main branch.
git checkout main
git pull
- Create a new branch that has exactly the same name as the file you are going to annotate.
In this example, we want to annotate the first movement of Corelli’s first trio sonata which is called
op01n01a.mscx, so we do:git checkout -b op01n01a
- Annotate the piece.
Open
op01n01a.mscxwith the latest version of MuseScore and insert your labels while saving the file from time to time. Don’t forget to create the following metadata fields by going through the menuFile -> Score Properties...:annotators(plural form!): your nameharmony_version: version of the annotation standard you are using (currently 2.3.0)

Entering metadata in MuseScore
Then, make sure that the score has an invisible metronome mark that reflects the tempo you’re imagining.
Tip
There are online metronomes that let you tap/click and tell you the tempo, e.g. https://online-metronome.org/
- Commit your changes locally and describe the commit in the commit message.
git add MS3
git commit -m "annotated mm. 1-15"
Hint
Since you’ll use these commands quite a lot, you might want to create aliases, i.e., shortcut commands, for example
gaandgc. A web search for “create alias [your operation system]” will tell you how.Other examples for meaningful commit messages could be
"annotated the entire movement"or"fixed syntax error in m. 17". Please include measure numbers whenever applicable.- Push your commits to GitHub and check if syntactical errors are detected.
git push
Note
At first (unless you have activated
push.autoSetupRemote, see Configuring Git) you will be asked to connect your new local branch to GitHub using the commandgit push --set-upstream origin op01n01aor whatever the name of the new branch is.Everytime you push your commits to GitHub, the scores you’ve modified will be checked automatically and you can see immediately if there are any syntactic errors or where the notes in the score do not match the label. At the end of the automated check, a bot will add or modify two review reports that might help you spot or make sense of errors. To see these files, you will need to update your local clone so that it includes the bot’s commit:
git checkout op01n06a
git pull
If you want to see the test result, simply head to the GitHub repository and click on the
Actionstab. There you will see your last commit with a small coloured symbol:- yellow:
Check in progress (wait a couple of seconds)
- green:
Everything OK
- red:
Syntactical error(s) detected

The last commit listed in the
Actionstab with the red icon symbolizing that the syntax check failed.¶When tests have failed, please go back to your local MuseScore file and commit the changes necessary to make them pass next time you push. Remember to include explanatory commit messages and measure numbers. Still under the
Actionstab, click on the failed syntax check and then onperform_check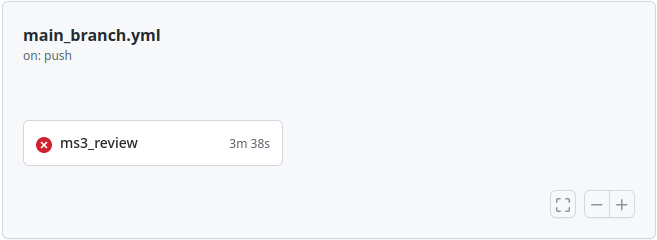
Click on “ms3_review”
Put the word “warning” into the black search bar and go through all warnings.
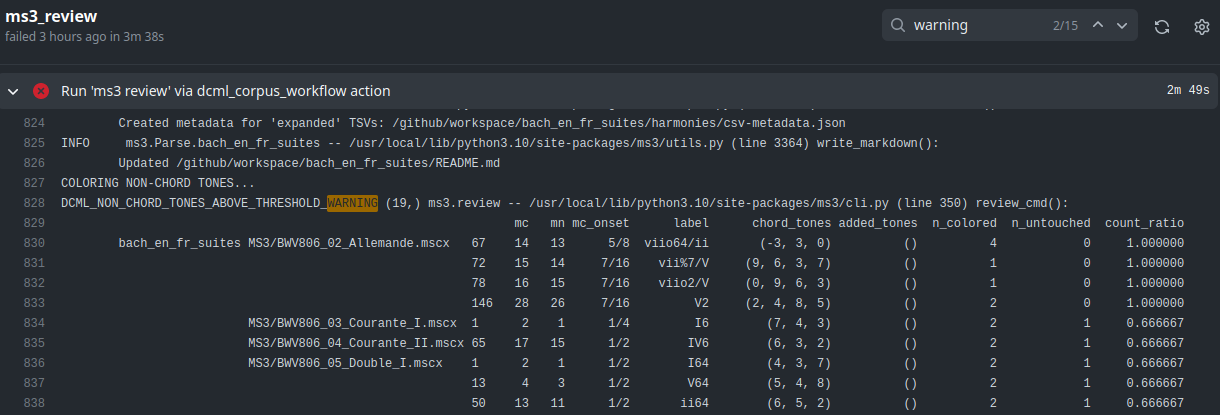
Output log of the ms3 review command; use the search bar to go through every _WARNING.
Where applicable, every warning comes with a measure count
MCand/or a measure numberMN. MC corresponds to the bar number that MuseScore displays in the status bar on the bottom left (not always identical to the measure number (MN) in the score). The warning’s message is hopefully expressive enough for you to know what to do. If not or you’re unsure, you may look it up in the section on warnings below. After doing the necessary steps, commit and push again, and the test should pass this time.- Once all your labels are syntactically correct, create a Pull Request.
There are (at least) three different ways for creating a Pull Request (i.e. a request for merging your annotations from the new branch into
main):Head to the main page of the GitHub repository where you should see a banner allowing you to quickly create a pull request:

GitHub offering to create a new pull request with the recently pushed annotations
Otherwise, select the new branch from the dropdown menu
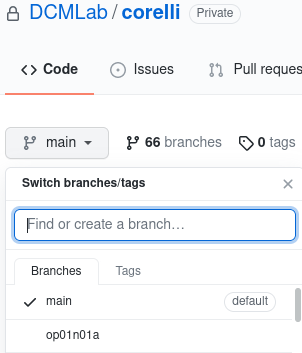
Selecting a branch on GitHub
and click on
Contribute -> Open pull request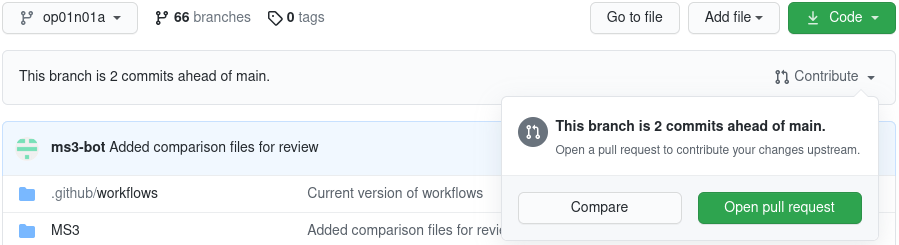
Opening a PR directly from the branch.
Or, head to the
Pull requeststab, click on “New pull request” and select your branch accordingly, like this: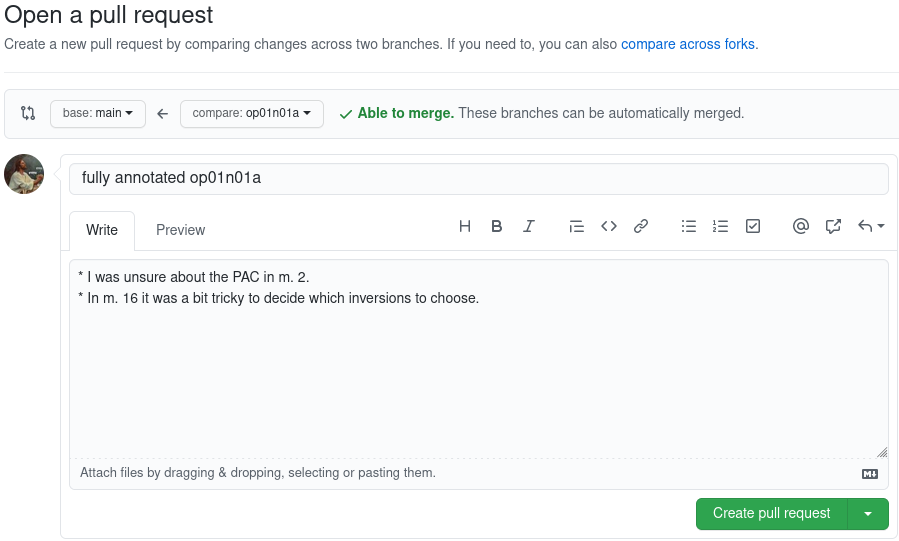
Giving the new pull request a meaningful title
Give the pull request a meaningful name including the exact file name, and include the URL of the OpenProject work package in the description. Feel free to add anything worth knowing below, e.g. specific measures where you would like to ask the reviewer for a second opinion. Once you confirm with the green button “Create pull request”, you’re done on GitHub; don’t forget to change the status and log the costs on OpenProject.
Important
Before you continue with the next task, make sure to checkout and pull the main branch before creating the new branch.
Review reports
Note
Don’t forget to update your branch using git pull after the bot has committed files.
If a commit includes modified MuseScore files, a bot will check them and add or update two review reports which are
located in the folder called reviewed. They include
a score where all non-chord tones are colored in red and, if the score already contained labels before the commit, it displays the changes applied to the labels in green and red;
and a TSV file that lists all the labels and where the last 6 columns contain the results of this coloring:
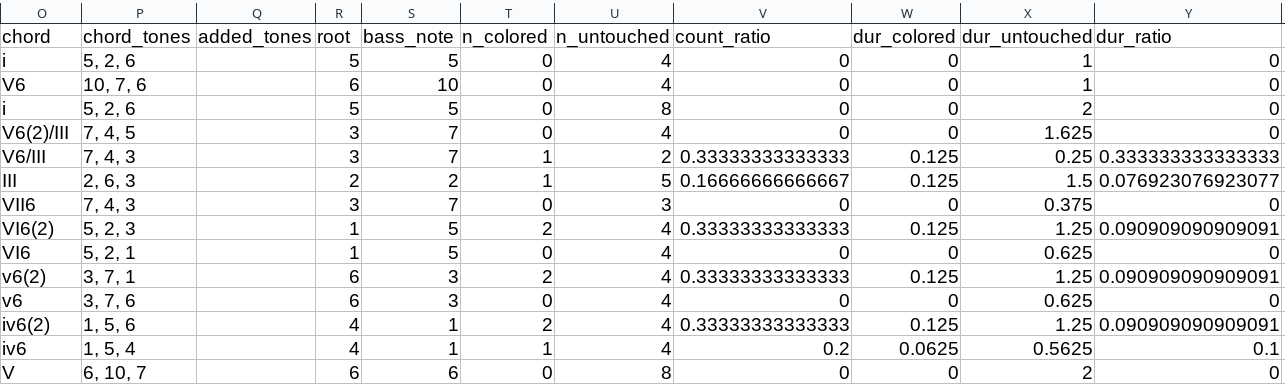
Example review report for the beginning of Corelli’s op01n06a (showing only relevant columns).
The chord column is the one that is translated into chord_tones. Different from the TSV files in the
harmonies folder, where it displays scale degrees, the integers here are to be interpreted as absolute notes
expressed on the line of fifths. For example, the first chord, i translates to (5, 2, 6), and reads as
B, D, F#. The last six columns describe properties of all notes that start in the given chord segment:
n_colored: Number of red notes, i.e. notes that are not covered by the chord label.n_untouched: Number of black notes, i.e. notes that are included in the label.count_ratio: Ratio between red vs. all notes in the segment. Values over 0.6 will cause the test to fail and warn the annotator.dur_colored: Summed durations of red notes, expressed in quarter notes.dur_untouched: Summed durations of black notes, in quarters.dur_ratio: Ratio between summed durations of red vs. duration of all notes in the segment.
December 2022
As of now, this check suffers from the problem that it considers only note heads in the given chord segment, meaning that notes sounding since earlier are not taken into account and that durations are not cut off when the chord segment ends. This will be improved in a future version.
Little trick
To quickly make sense of higher values on the line of fifths, such as (10, 7, 6) in the second row, it helps to
think in chromatic shifts, 7 fifths. In other words we can read this as #3, #0, #-1, i.e. #A, #C, #F.
Modulation plans
December 2022
The updated workflow does not yet output modulation plans.
Since November 2021, the DCML workflow includes a new feature, namely the automated creation of modulation plans.
Once a Pull Request (PR) is created, modulation plans are generated and updated for all altered MuseScore files. They
come in the form of HTML files and are stored in the folder tonicizations. After you create a PR or push into an
existing one, the ms3-bot will commit these files, so in order to view them, you need to wait for the bot’s commit
and then pull it into your local clone.
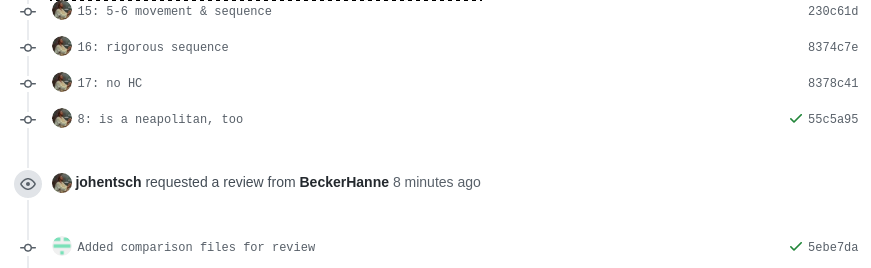
For example, in this PR,
the annotator pushed a new set of annotations, requested a review and then the bot added
the HTML file in the commit “Added comparison files for review”. In order to view the file, the annotator will
do a git pull, find it in the folder tonicizations and open it in a browser:
- Gantt chart:
Automatically generated modulation plan in HTML format, displayed through a browser.
The modulation plans display the tonal hierarchy represented by your annotations and allow you to check if your labels correspond to your understanding of the piece’s structure. The keys that the piece modulates to are shown in blue, temporary tonicizations (slash notation) are shown in red, and adjacency of the tonicized numerals in green. More detailed information on the keys is shown when hovering over the figure. If you find inconsistencies, simply correct them in your MuseScore file and commit them into the open PR, the modulation plan will be updated and overwritten, so you can pull it and check it once more.
Upgrading annotations
Upgrading an existing set of annotations created under an older version of the DCML annotation standard roughly follows the same workflow as the creation of new labels above. The main difference is that during the upgrade, you commit your changes individually, justifying each of them in a commit message starting with the respective measure number.
- Create a new branch and adapt the metadata.
As an example, let’s upgrade the labels of
op01n06a.mscxfrom version 2.1.1 to 2.3.0. In this screencast, the score is already open and you see how the metadata is updated and committed to a new branch calledop01n06a.Note
that the commands
gaandgcare aliases, i.e. shortcut commands, which you would replace bygit add MS3andgit commit -mrespectively (unless you have created your own aliases).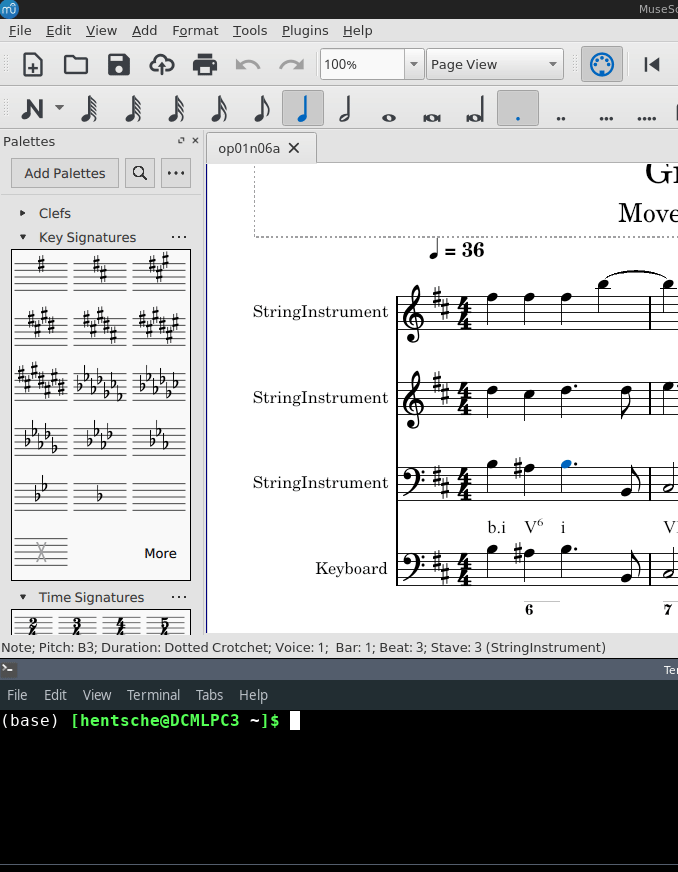
Updating the metadata reflecting the version upgrade. The screencast starts at
cd corelli.¶As you can see, the metadata field
annotatorsis updated in a way that the old version is added to the previous annotators and that the upgrader adds themselves to the annotators, indicating the new versions. Since the version upgrade includes a review of the existing labels, they also add their initials to thereviewersfield.- Review and update the labels and commit your changes individually.
The following screencast demonstrates the upgrade process of
op01n06a.mscx. In principle, after every change the file is saved and the change is committed with the measure number and an explanation.Note
that the commands
gaandgcare aliases, i.e. shortcut commands, which you would replace bygit add MS3andgit commit -mrespectively (unless you have created your own aliases).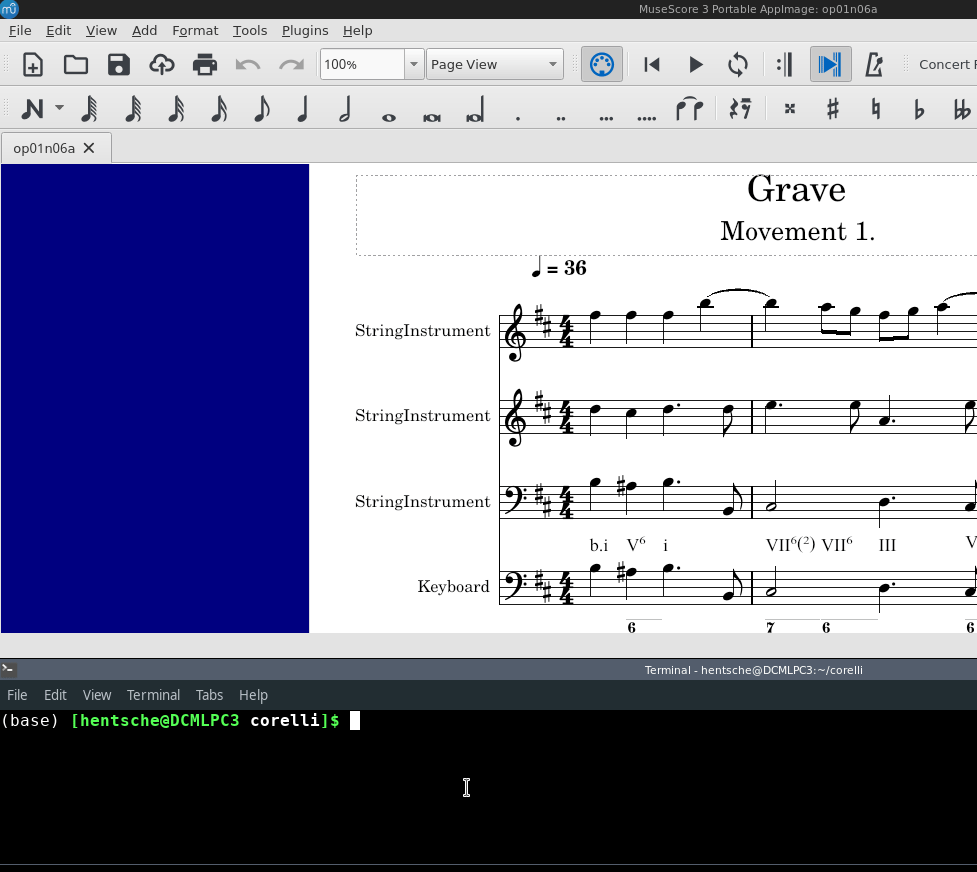
Creating individual commits for every change or group of changes. The screencast produces the syntax error
V6/III(2)(instead ofV6(2)/III) that is automatically detected upon push to GitHub (see screenshot below).¶As you can see, similar changes can be grouped as one commit, as for m. 2. Phrase annotations such as the added curly bracket in m. 1 do not need to be committed individually.
- Push your commits and create a Pull Request
From here on, the procedure is the same as for new annotations, only that the PR will be called something like
Upgraded op06n01a to 2.3.0. Just like for new annotations, your version will be syntactically checked. For example, the mistake in the above screencast will be displayed like this:
Automatically detected syntax error from above, as displayed on GitHub.
Shortly after opening the PR, the ms3-bot will create two additional files that will help you and the reviewer understand your changes: An additional MuseScore file showing all changes you have made, and a modulation plan (in the folder
tonicizations) reflecting your updated set of labels. To see these files, you will need to update your local clone so that it includes the bot’s commit:git checkout op01n06a git pull
Reviewing a set of annotations
Update December 2022
Before the update, this section explained how the reviewer would have to first merge the PR and then merge the main branch back into the annotation branch. This is not required anymore and reviewers simply add commits into the open PR.
Preparing the review
- First, open the Pull Request containing the new labels and check if all syntactic errors have been corrected.
As can be seen in the following image, in the PR, all commits made by the annotator and by the ms3-bot are listed, two in this example.
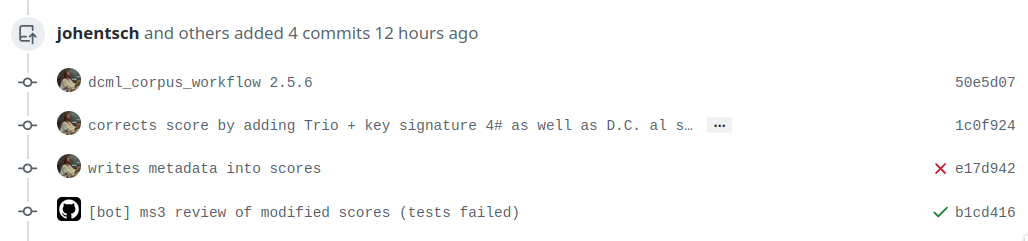
A pull request were some syntactic errors have not been corrected yet.
It is important to notice that the last commit made by the annotator (
writes metadata into scores) has a red cross instead of a green check. Although the last commit by the ms3-bot has a green check, the error persists (bot’s commits are not checked for syntactical correctness). In this case, please leave a comment below, asking the annotator to correct the labels and to let you know once they are done.- Checkout the annotation branch and pull the changes.
git checkout <branch>
git pull
Doing the review
- Now you are ready to start your review.
At first you start by adding your initials to the metadata field
reviewers(plural!), comma-separated in case the field is already populated. Doing that, you may also want to check whether the annotator spelled the fieldsannotatorsandharmony_versioncorrectly.Check if the score has an invisible (unless written by the composer) metronome mark reflecting a tempo that you could agree on. If not, create or modify it as an individual commit.
Update November 2021 If present, check the associated modulation plan by finding the corresponding HTML file in the folder
tonicizationsand opening it in your browser. It helps to check if the tonal structure expressed by the labels corresponds to the one you and the annotator have in mind.Reviewing a new set of annotations means reading through the labels to see whether you agree with each of them on the basis of the annotation tutorial, paying special attention to consistency within the piece and consistency across similar annotated pieces.
For every label where you feel the need to remove, reinsert, or replace it, you do the change directly in the MuseScore file, save it, and commit the alteration giving as a commit message the measure number(s) and your justification. In the case of obvious mistakes, it is enough to indicate the replacement, as in
"4: #viio/V => viio/V". You may indicate commits were your change is a suggestion that you would be happy to discuss by a trailing question mark, e.g."15.2: how about including V65 as an alternative label?". You may also address the comments and questions that the annotator had left with their original PR in commit messages, or you could address them in comments, as explained below. The procedure is technically identical with the example screencast above.Once you are happy with the labels in their entirety, you are ready to push your changes and see whether the syntax check passes.
Important: Go the
Files changedtab in the Pull Request, click on “Review changes”, set the radio button toApprove, leave the annotator a few friendly words, and click on “Submit review”. Before you do this step, the PR cannot be merged. By approving you are giving “green light” for the merge. If, on the other hand, you think the set of labels isn’t quite there yet, you can set the radio button to “Request changes” and write a detailed comment on what you think needs further improvement, justifying why you did not do the change yourself.
Engage in the discussion
From here on, monitor your GitHub notifications for reactions to your PR from the annotator. Use the comment function to discuss individual solutions until you find a consensual one for each controversial label. This process usually includes you and the annotator committing further changes to the MuseScore file with expressive commit messages (always including the measure number). In case you are working with the automatically generated
_reviewedfile to display the changes made in the last commits, be aware that you never commit changes to this file, since they will be overwritten automatically.In the (rare) case where you would be unable to form a consensus, please include in the discussion a third person of whom you think they could bring in weighty arguments. Another way would be to bring the discussion to a Mattermost channel if you think the question requires a fundamental decision based on a larger consensus.
Once the new annotations correspond to a consensus between you and the annotator, please “approve the change” (see above) so that the annotator can merge the PR.
Reviewing a set of upgraded annotations
- Making use of the
_reviewedfile. In the case that existing labels were upgraded, the bot will have created a
_reviewedfile in thereviewedfolder that shows which labels between the current and the last bot commit. This means that for starting the review, you can checkout and pull the corresponding branch and view the file to see all changes made by the upgrader. Once you commit your changes on top, the file will be updated to reflect the changes between the deprecated labels (those that the upgrader updated) and the final version after your review. If you were to instead generate a file reflecting only the differences before and after your review, you would have to follow the steps in the previous section, i.e. merge the PR and open a new one.- Review the labels
The procedure is essentially the same as the one for reviewing new annotations above. The difference is that you focus more on the labels changed by the upgrader, exercising particular care for potential inconsistencies that might have arisen; for example by applying a change to one place but not to an analogous one; or by having missed a subtle aspect in the previous, replaced label, that actually made for an ideal solution; etc.
Reacting to a review & reaching expert consensus
Once your file(s) got reviewed, the reviewer creates a pull request (PR) and requests your review. You should receive an e-mail notification, if not, please check your GitHub settings. Now your task is to go through all changes and see whether you agree with all of them. Here is how:
How to review a review
Open the PR from your notification e-mail or go to GitHub and open the Pull requests tab where you should see it.
The PR lets you inspect all changes and start discussions. Most importantly, after opening it, you will see all
commits made by the reviewer:
List of commits made by the reviewer
Clicking on one of them will show you the corresponding changes in the MuseScore file. But it might be hard for you to assess the changes without looking at the actual music. Therefore:
The last commit, called “Added comparison files for review”, was made automatically by ms3-bot,
creating an additional MuseScore file with the suffix _reviewed. Therefore, the first thing you want to do to
review the review, is locally checkout and pull the branch corresponding to the PR
(it should be the same you created for annotating). As an example, if in the PR it says

johentsch wants to merge 2 commits into main from op01n01a
it means you do:
git checkout op01n01a
git pull
Now you should have the comparison MuseScore file _reviewed
in your local clone and can open it in MuseScore. It shows unchanged labels in black,
labels removed by the reviewer in red, and labels added by the reviewer in green.
The sole purpose of this file is to help you with the review of the review and will be deleted
at some later point (it is not listed in the metadata either). In case this comparison file (and the corresponding
commit Added comparison files for review) is missing, the reviewer might have made a procedural mistake and
you should ask for it to be created before you review the changes.
How to finalize the review of the review
Now you can go through the list of commits one by one and check how they play out in the comparison file. For every
change that you agree with, there is nothing you need to do. In cases where you don’t agree, you write a comment
on GitHub (see next subsection) and discuss with the reviewer until you find a solution that satisfies both analytical
views. In addition, you may want to suggest a new label by integrating it in the original file (not the
_reviewed file) and committing the change with a meaningful commit message that includes the measure number
(e.g. "14.4: included my original solution V43(4) as an alternative solution").
Once you push the changes, they will be included into the PR and the comparison file will be updated accordingly.
As soon as the original file contains a set of annotations that you and the reviewer agree to be the best possible
solution, the person who made the last
decision in the process merges the PR. As a last step, go to the main branch, wait for the automatic
Automatically added TSV files from parse with ms3 commit, and check if the corresponding table row in the
README got updated correctly (otherwise, the metadata fields in the MuseScore file were not correctly populated).
The piece has now been finalized and is ready for eventual publication. Thank you!
How to start a discussion
To start a discussion, click on the commit you disagree with. On the left you see in red your previous version and on the right, in green, the changes made by the reviewer. Hovering over the code lines, you will see a blue plus that lets you add your comment. It is important that you add the measure number so that the reviewer can find the spot and react to your comment.
Starting a discussion by commenting the reviewer’s commit
The comments and resulting discussions will be visible in the PR’s “Conversation” tab (under the list of commits). Don’t forget to press the Subscribe button on the right to get informed about reactions to your comments.
What to do about the warnings?
There can be a range of reasons why you may see a WARNING in the output log of the automated tests. They may arise
due to
Syntax errors (e.g., one or several labels do not conform to the current version DCML harmony annotation syntax)
Semantic mismatches (i.e., one or several labels express chord tones that match the notes in the given segment(s) badly or not at all)
Irregularities and score encoding errors (e.g. one that leads to wrong measure numbers)
If you are currently annotation or reviewing annotations, you need to take care of the first two types. Should you encounter encoding errors, please mention them in your Pull Request. In case your test fails but, instead of a warning, you get a (somewhat cryptic) error, this might actually a bug, i.e. mistake in the code. If you think it is, please create an issue and point us to the error, e.g. by pasting the output or a link to it, and the score in question so we can look into it.
There are three ways to deal with a warning:
- Fix it.
If the warning message is clear and points you to the relevant spot in the score, you simply go ahead, fix it and commit the change. If not, please look at the list of warnings below to see if there are instructions on how to fix it. Otherwise, please ask for help on Mattermost.
If you have the
ms3command set up locally, before pushing you can runms3 review -M -N -X -F -C -D -i <filename>
in order to see if the warning is indeed gone.
<filename>is a regular expression that lets you filter the files you want to check. For example, if the filename convention is something likeop<##>n<##>_<movement>.mscx, we could executems3 review -M -N -X -F -C -D -i op02to review all files containing “op02” in their names, or “02n02” for op.2, no.2 only.- Declare it a false positive.
If you think the warning is not warranted, you can add it to the IGNORED_WARNINGS file together with an explanation why this warning should be ignored for all times. This will prevent it from being displayed again.
- Create an issue to make sure someone deals with it later.
If dealing with a warning that is not part of your current workflow (e.g., an encoding error when annotating or harmonizing), you can create an issue for the relevant repository on GitHub to make sure someone deals with it later. If you want to get your PR through despite the warning, please add a comment mentioning that.
Note
If the following list of warnings does not include information on how to fix one, it is assumed that the warning message itself is expressive enough. Otherwise, please let us know, e.g. by creating an issue on GitHub.
Syntax errors
#8 DCML_HARMONY_KEY_NOT_SPECIFIED_ERROR
#12 DCML_HARMONY_INCOMPLETE_LOCALKEY_COLUMN_ERROR
#13 DCML_HARMONY_INCOMPLETE_PEDAL_COLUMN_ERROR
#15 DCML_HARMONY_SYNTAX_WARNING
#16 DCML_PHRASE_INCONGRUENCY_WARNING
#17 DCML_EXPANSION_FAILED_WARNING
Semantic mismatches
#6 DCML_HARMONY_SUPERFLUOUS_TONE_REPLACEMENT_WARNING
#18 DCML_SEVENTH_CORD_WITH_ALTERED_SEVENTH_WARNING
#19 DCML_NON_CHORD_TONES_ABOVE_THRESHOLD_WARNING
Appears when the ratio between out-of-label notes and all notes in the segment is above a pre-defined threshold. This validation currently has the limitation that notes which overlap into the segment are not taken into account, only those that appear as a note head.
Please keep in mind that the validator is simply a tool for detecting potential problems. If you have checked a particular place and found that the warning is not justified, please add it to the IGNORED_WARNINGS file, followed by a concise comment, which can replace the indented warning text following the header that includes the logger name, but must begin each new line with a TAB. The comment should clarify for future readers why the warning is ill-founded. If you are not sure, please ask on Mattermost. Over the course of time and based on these questions, we will complete this section with concrete instructions on how individual warnings should/can be addressed (and/or fix the validator).
#27 DCML_DEFAULT_CORRECTION_WARNING
Appears when a very common mismatch is automatically corrected before computing the chord tones for a label.
Currently this is the case for all labels with root vii# when the localkey is major.
Irregularities and score encoding errors
#1 MCS_NOT_EXCLUDED_FROM_BARCOUNT_WARNING
#2 INCORRECT_VOLTA_MN_WARNING
#3 INCOMPLETE_MC_WRONGLY_COMPLETED_WARNING
#4 VOLTAS_WITH_DIFFERING_LENGTHS_WARNING
#5 MISSING_END_REPEAT_WARNING
#9 COMPETING_MEASURE_INFO_WARNING
#14 LOGGER_NOT_IN_USE_WARNING
#20 UNUSED_FINE_MARKER_WARNING
#21 PLAY_UNTIL_IS_MISSING_LABEL_WARNING
#22 JUMP_TO_IS_MISSING_LABEL_WARNING
#23 MISSING_TIME_SIGNATURE_WARNING
No time signature present throughout the piece. Needs adding one.
#24 BEGINNING_WITHOUT_TIME_SIGNATURE_WARNING
This warning shows when more than just the first bar has no time signature (if it’s only one measure it is considered to be an incipit). Please check if a time signature is missing or add the warning to IGNORED_WARNINGS.
#25 INVALID_REPEAT_STRUCTURE
#26 UNFOLDING_REPEATS_FAILED_WARNING
#28 WRONGLY_ENCODED_POSITION_WARNING
Shown when a quarterbeats column is to be added to a table but the events are not in chronological order, which
results in incorrect values in the duration_qb column computed from the quarterbeats column (events that would
result in negative durations are exluded). Since the tables normally are in chronological order, this is most likely
a mistake in the encoding resulting in a negative mc_onset.
#29 FIRST_BAR_MISSING_TEMPO_MARK_WARNING
Every piece should begin with a hidden metronome mark indicating the beat unit of the piece (e.g. dotted quarters
in compound 6/8 meter). Consequently, there should be additional marks if the beat unit changes later in the piece.
Ideally, the marks are inserted by the harmonic annotator to indicate the tempo they were imagining while annotating.
Otherwise, the tempo is to be chosen based on a reasonable judgement, potentially consulting one or several recordings.
Hiding the metronome mark ensures it is not mistaken for one written by the composer.
#32 FRICTIONLESS_VALIDATION_ERROR_WARNING
Appears when an extracted TSV file cannot be successfully validated against the corresponding .json descriptor
file. This is probably due to a bug, please file an issue with ms3.
IGNORED_WARNINGS
In cases where ms3 detects an irregularity in a score, e.g. irregular measure lengths that don’t add up,
and you notice that the irregularity is musically warranted (for instance, it could be a cadenza), you can prevent
that particular warning from being displayed again by adding it to an IGNORED_WARNINGS file. In other words,
you go to your clone of the repository and check if an IGNORED_WARNINGS file is already present. Otherwise,
open a new text file called IGNORED_WARNINGS (without file extension).
Copy the warning that you want to suppress. You can either be lazy and copy the whole log message:
VOLTAS_WITH_DIFFERING_LENGTHS_WARNING (4, 17) ms3.Parse.bach_en_fr_suites.BWV806_08_Bouree_I -- /home/hentsche/PycharmProjects/ms3/src/ms3/bs4_measures.py (line 817) treat_group():
    Volta group of MC 17 contains voltas with different lengths: [2, 1] Check for correct computation of MNs and copy this message into an IGNORED_WARNINGS file to make the warning disappear.
Or, the preferred way, would be to include only the heading up to the --, and include a comment on why this warning
should be ignored in the future, e.g.:
VOLTAS_WITH_DIFFERING_LENGTHS_WARNING (4, 17) ms3.Parse.bach_en_fr_suites.BWV806_08_Bouree_I
    First volta has two bars, m. 16a and m. 1b. Encoded as two measure numbering offsets, MC 18 has -15 and MC 19 has +15 because it's m. 16b.
The comment can have multiple lines but it is important that each line (except the header) begins with a <TAB>,
like in the examples here.
Commit the file and the warning should disappear. Otherwise, please file an issue with ms3.