DCML Corpus Creation Pipeline
Collect and prepare the digital edition in the latest MuseScore format
Prior research
Check which pieces make up the collection
how they are grouped
what naming or numbering conventions exist
which editions there are
if different versions of the pieces exist.
Come up with a list (and hierarchy) of names. Here, you can already think of a good naming/numbering convention for the corpus.
It might be good to create the list of the overarching group of works even if your corpus will contain only parts of it, for the sake of a better overview.
Example: Going from the list of Monteverdi’s Madrigal books to an initial README file.
Look up and check existing scores
- All scores available need to be checked and compared:
reference edition
completeness
quality & errors
license (later publication!)
file format and expected conversion losses
- Where to check
First: musescore.com because the scores are in the target format
musicalion.com (not free to publish: need to ask first)
choral music: CPDL
http://kern.ccarh.org/ lossless humdrum 2 musescore conversion needed
Typeset non-existent files
pick reference edition and send commission to transcriber
depending on the music, prices may vary between 5 and 20 CHF per page
File curation
The scores need to be corrected on the basis of a reference edition/manuscript. This documentation includes the DCML Score Conventions which stipulate which information from the reference edition/manuscript needs to be encoded in what way. Please send a request to be added to the document.
- Convert to MuseScore format
XML, CAP: can be done with MuseScore’s batch converter plugin or with
ms3 convertCAPX: Conversion to CAP or XML with DCML’s Capella license
MUSX: Conversion to XML with private Finale copy
SIB: Conversion to XML with Sibelius on DCML’s iMac
LY: no good conversion available
KRN: hum2xml can be used but it would be preferable to have our own converter to MuseScore
results need to be checked; especially markup such as slurs, arpeggios, trills etc. often get screwed
- Renaming
Decide on naming convention and create a map (without extensions) from old to new filenames
- Sometimes, files need to be split at that point because they contain several movements
For this, you introduce section breaks separating the movements
After every section break, you have to re-insert the time and key signature or add it into the split file
Start with the last movement, select it and do File -> Save Selection
Repeat for all movements
Rename the files
Possibly add a small script that automatically renames the source files
- Use parser/checking tool and/or manual checks for consistency
- certain bars need to be excluded from the bar count:
anacrusis
pickup measures throughout the piece
- alternative endings are different versions of the same measure numbers
to make sure that the second ending has the same measure number as the first one, go to the “Measure properties” of the first one and enter in the field “Add to measure count:” the negative number of bars of the first ending.
In the example of two endings with the default measure numbers
[15|16][17|18], we add-2to the measure count of17and thus achieve[15|16][15|16].
- irregular measure lengths need to complete each other
e.g. when a repeated section starts with a pickup measure, the last measure of the repeated section needs to be shorter
anacrusis is substracted from the last bar
- if in the reference edition the bar count restarts in the middle of the piece (e.g. in some variation movements), you can
either: split the movement into individual files (not preferable if you want to keep the movement as one coherent unit)
or: have two versions, one working version with continuous (unambiguous) measure numbers that depart from the reference edition, and one that is provided separately, that has the original (ambiguous) measure numbering but is not used for computational purposes. The reset of the counter should not be done via “add to measure count” using a negative number, but rather via section breaks.
Create metadata
All metadata fields are automatically extracted by the dcml_corpus_workflow and represented in the repository’s
metadata.tsv file. However, at the beginning this file needs to be created using the command ms3 extract -D -a.
The first column, fname, is used as IDs for the corpus and needs to be checked. In case the corpus contains
several alternative scores for the same piece, the main MuseScore file should have the shortest file name and the
alternative scores’ file names should begin with the same fname plus a suffix or a different file extension.
Upon creation of the metadata.tsv file, all scores will be listed and you can safely remove the rows corresponding
to the alternative versions to prevent them being processed by ms3.
Once the metadata.tsv is there and contains one row per piece, metadata curation is as straightforward as
updating values and adding columns to the file and then calling
ms3 metadata to write the updated values into the corresponding Musescore files. Be aware that calling
ms3 extract -D will overwrite the manual changes in the TSV file with any value existing in the MuseScore files.
so make sure to commit your manual modifications to not loose them.
Warning
Although many editors open TSV files, many of them silently change values, e.g. by removing
.0 from decimal values (LibreOffice) or turning a 4/4 time signature into a date (Excel,
Numbers). One editor that doesn’t to that is VScode. Make sure to always view the diff before
committing changes to metadata.tsv to avoid unwanted modifications or, worse, loss of data.
Once the metadata.tsv is there and contains one row per piece, you can either continue with the following section
and create the new Git repository or enrich the metadata first. Since enriching metadata
involves modifying the scores, however, it is preferable to make metadata curation part of the Git history.
Creating a repository with unannotated MuseScore files
Danger
After we start the annotation workflow, no MuseScore files should be added. removed, or renamed! The edition needs to be complete and the file names final.
Before starting annotating a corpus, a repo with the standard folder structure needs to be created:
.
├── MS3
└── pdf
The directory MS3 contains the unannotated MuseScore files and PDF the print edition or manuscript which they
encode. In order to activate the annotation workflow (i.e. the automatic scripts triggered on the GitHub servers
by certain events related to annotation and review), the folder .github/workflows needs to be copied from
the template repository. It also contains our
standard .gitignore file which prevents temporary files from being tracked and uploaded.
Variant 1: Using the template repository
You can create the new repo directly from the template repository
by heading there and clicking on ‘Use this template’. In this variant, every push to the main branch results
in metadata, measures and notes being extracted from all changed .mscx files. Note that renaming and deleting
files will lead to undesired effects that will have to be checked and corrected manually.
Variant 2: Starting from scratch
Or you simply create the new repo with the above-mentioned folder structure and add the workflow scripts when the scores are prepared. In this case, you will have to use the Python library ms3 to extract metadata, notes, and measures manually.
Variant 3: Splitting an existing repository
This is for the special case that the MuseScore files in question are already sitting in a subfolder of an existing
repository which is to be transferred into the new repo including the files’ Git histories. This variant is a bit
more involved and requires prior installation of the git filter-repo
command which is recommended by the Git developers for replacing git filter-branch.
- Setting
As an example, we will create a new repository
chopin_mazurkas(Repo B) which will include all files situated in the existing repositorycorpora(Repo A) in the subfolderannotations/Chopin-Mazurkas, with the workflow scripts added on top.- Create the new repo B
On GitHub, we use the template repository to create the target repo
chopin_mazurkaswith the workflow files and the standard.gitignore. Locally, we initialize an empty Git repo that will be connected upstream at a later point:mkdir chopin_mazurkas && cd chopin_mazurkas && git init
Make sure that your Git is configured to use the name
mainfor the default branch, which can be achieved usinggit config --global init.defaultBranch main.- Clone repo A and transfer files
We start off with a fresh clone of
corpora, head into it and run:git filter-repo --subdirectory-filter annotations/Chopin-Mazurkas/ --target ../chopin_mazurkas
which will copy all files from
annotations/Chopin-Mazurkas/to the freshly initialized repochopin_mazurkastogether with their full commit histories. If there is a README file, rename it toREADME.md.- Connect local repo B to the remote repo B
The local
chopin_mazurkasnow contains the files at the top level together with the full commit history (check outgit log). Now we can connect it to the remote and merge the workflow scripts from there:git remote add origin git@github.com:DCMLab/chopin_mazurkas.git git pull origin main --allow-unrelated-histories git push -u origin main
- Clean metadata
In case there was an older
metadata.tsvit should now be automatically updated and you might have to clean it. This may involve naming the first two columnsrel_pathsandfnames. For the Mazurka example, this Pull Request shows the metadata cleaning and update of the existing files from an older MuseScore and annotation standard.
Configuring and adding the new repo
Set the standard repo settings on GitHub:

Under
Branches, create a branch protection rule for the main branch:
Under
Collaborators and teamsgive write access to theannotatorsteam.Add the new repo to the corresponding meta-repositories (at least to
all_subcorpora, see below).Add the new repo to the annotation workflow (drop-down menus, OpenProject, WebHooks, workflow_deployment repo etc.)
Adding the repo to one or several meta-repos
The individual subcorpora can be embedded as submodules in meta-repositories. These meta-repos are listed in the private meta_repositories repo. Currently, the most important ones are:
dcml_corpora for published corpora
all_subcorpora (private) for all published and unpublished corpora.
To add the new repo, head into the meta-repo and do
git submodule add -b main git@github.com:DCMLab/chopin_mazurkas.git
Just to be sure, update all submodules: git submodule update --remote and push the whole thing.
Creating work packages on OpenProject
Follow the instructions for create_work_packages.py under https://github.com/DCMLab/openproject_scripts/
set the column
parentto the name of the repositoryrename the columns
fnames => nameandlast_mn => measuresif the new work packages are for annotation upgrades rather than new annotations, add the column
work_package_typewith valueAnnotation Upgradefind out the status of all pieces and fill the column
status. Accordingly:if annotations are present and need to be updated, rename
annotators => reviewerand make sure that every cell contains exactly one user name (First Last) known to OpenProject;if review is done or ongoing, do the same for the renamed column
reviewers => reviewerif annotations are present and finalized, the work package, in theory, does not need to be created; if it is, it should have status “Not available”. Filling the fields
assigneeandreviewer, is not needed unless for invoicing purposes
Create a new view in OpenProject:
open any of the existing corpora views
replace the
Parentfilter with the repo namein the menu, select
Save as...enter the repo name and check
Public
Add the webhook to the repo
go to a repo for which the webhook is already set up
in the repo settings, go to
Webhooks, clickEdit, and copy thePayload URLin the new repo, go to
Settings -> Webhooks -> Add webhookand insert the copiedPayload URLset the
Content typeto “application/json”Below, select “Send me everything” and click
Add webhook
Add the new work packages to the master sheet for the administrative staff
Curating and enriching metadata
In MuseScore, metadata is stored as key -> value pairs and can be accessed and modified via the menu
File -> Score Properties.... Some fields are there by default, others have to be created using the New button.
It is very important that the fields are named correctly (double-check for spelling mistakes) and all lowercase.
The command ms3 extract -D extracts the metadata fields from the MuseScore files, updating the
metadata.tsv file in a way that every row corresponds to a MuseScore file where every key is a column showing
the value from the corresponding file. Likewise, this can be used to batch-edit the metadata of several or all
MuseScore files in the corpus by editing the metadata.tsv file and calling the command ms3 metadata.
Warning
Before manipulating metadata.tsv make sure to call ms3 extract -D, ensuring that it is up to date
with the metadata contained in the MuseScore files. Otherwise the command ms3 metadata would overwrite
newer values, resulting in the criminal offense of undoing other people’s work.
DCML corpora usually come with one MuseScore file per movement, hence we follow the convention that anything related to
work describes the whole group (Suite, Symphony, etc.) or cycle (e.g. song cycle), and fields containing
movement or mvt its individual parts. It follows that in the metadata.tsv file titles, catalogue numbers,
URIs etc. may be repeated and identical for the parts of a work. Identifiers for individual movements are often
hard to come by, but MusicBrainz has already a good number of them. For compositions
where the subdivision into parts is somewhat arbitrary (consider the grouping into tracks for recordings of the same
opera), the question of unique identification is an open problem.
Note
Whereas in filenames we avoid all diacritical signs, accents, Umlaute etc., the metadata needs to include them
accurately encoded in UTF-8. For example, write Antonín Dvořák, not Antonin Dvorak. Whenever in doubt,
go with the English Wikidata/Wikipedia.
Default fields
The following default fields should be populated where applicable:
- composer
Full name as displayed in the English Wikipedia. For example, Tchaikovsky gets
Pyotr Ilyich Tchaikovsky.- workTitle
Name of the entire work/cycle, e.g.
WinterreiseorPiano Sonata No. 1 in C majorwithout any catalogue or opus numbers. The title should largely correspond to the Englishlabelof the corresponding (or future) Wikidata item.- workNumber
This is where opus and catalogue numbers go, e.g.
Op. 33, No. 3, BI 115-3.- movementNumer
Ordinal number of the movement or part. Should be an arabic integer, e.g.
2(not2., notII).- movementTitle
Title of the part, e.g. song title, or
Andante(notII. Andante). If unclear, CD track titles might serve as an orientation.- source
URL of the adapted digital edition, e.g. a link to musescore.com or kern.humdrum.org.
Required custom fields
The following fields need to be populated.
- composed_start, composed_end
Each of these two fields needs to contain a 4-digit year number such that taken together they represent the time span during which the piece was composed according to
composed_source. If the time span lies within the same year, both fields contain the same number. If the source indicates an open interval (e.g.?-1789), we use the EDTF convention to indicate the unknown date (herecomposed_start) as... If no composition date is known, we use the following dates as fallback, in that order:year of the princeps edition
musicologically informed time span (e.g. the composer’s “sad phase” from x-y)
composer’s life span
In any of these cases, an explaining comment should be added to the
composed_sourcefield.- composed_source
The reference to where the
composed_startandcomposed_enddates come from. Could be a URL such as https://en.wikipedia.org/wiki/List_of_compositions_by_Edvard_Grieg, the name of a dictionary or work catalogue, or bibliographical data of a book. The latter would be required in the case of using a “musicologically informed time span” (see above). This field is free text and, in the absence of composition dates, should contain additional information on what exactly the years represent, e.g.dates represent the "late period" of composer X's work, as proposed by author Y in book Z, page n.
Identifiers where available
Identifiers are important for making data findable and interoperable but might not always be available. Nevertheless, the goal should be to find minimum one of the work or part-of-work identifiers listed below. Wikidata identifiers are the gold standard because they often come with a mapping to all sorts of other identifiers. In addition, Wikidata is a knowledge graph which lets us easily pull additional metadata. The site has the drawback that identifiers for less known works are mostly missing as of yet and so are identifiers for individual movements. Until the fundamental problem of community-wide work identifiers is solved, we should aim at completing missing Wikidata items and foster the graph’s function as a Linked Open Data hub and registry for all other sorts of identifiers.
- wikidata
This field is used to identify the
workwith the full URL of its corresponding Wikidata item, e.g. http://www.wikidata.org/entity/Q2194957. If thecomposerandworkTitlefield are properly filled in, they can be reconciled with, i.e. matched to, Wikidata using OpenRefine. Tip: If you happen to have the Wikipedia page open, you can quickly access the Wikidata item by clicking onWikidata itemtheToolsmenu in the upper right (new layout) or in the left sidebar (old layout).- musicbrainz
musicbrainz.org has a whole lot of different identifiers, in particular for identifying individual recordings down to the level of CD tracks. The ones we’re interested here are work identifiers (make sure the URI starts with
https://musicbrainz.org/work/). The project is very advanced with creating identifiers on the sub-work (movement) level and we use those whenever available (see screenshot below). If not, we repeat the work ID for each movement.
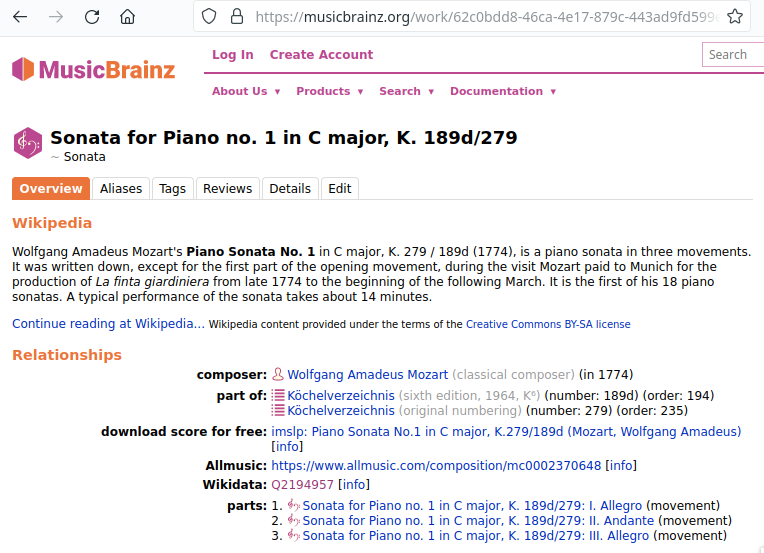
Example of a work displayed on musicbrainz (note the URL). In this case, it lists identifiers for its three movements so we would be using these.
- viaf
Work URI, e.g. https://viaf.org/viaf/181040674
- imslp
URL of the work’s Wiki page, e.g. https://imslp.org/wiki/Piano_Sonata_No.1_in_C_major%2C_K.279/189d_%28Mozart%2C_Wolfgang_Amadeus%29
We use this field, if applicable and available, to store the permanent link to the source PDF which the digital score is supposed to represent. Most often this will be an IMSLP “permlink” pointing to a particular edition through its ID, such as https://imslp.org/wiki/Special:ReverseLookup/1689 (the corresponding PDF file name starts with
IMSLP01689). Such a permlink is available via the edition’s menu, by clicking onFile permlink.- P<number> (<description>)
Columns with a Wikidata “P-number” are used for storing a reconciliation with the Wikidata knowledge graph. For example, the column
P86 (composer)contains both the ID of the property ‘composer’ and in parenthesis the English label of the property. The values of the column are the “Q-numbers” of the composer item. For more information, refer to Reconciling metadata with Wikidata below.
Contributors and annotations
Custom fields to give credit to contributors and to keep track of versions of annotation standards and the likes.
The preferred identifiers for persons are ORCIDs such as 0000-0002-1986-9545 or given as URL, such as
https://orcid.org/0000-0002-1986-9545.
- typesetter
Name/identifier/homepage of the person(s) or company who engraved the digital edition or major parts of it.
- score_integrity
Name/identifier/homepage of the person(s) or company who reviewed and corrected the score to make it match the reference edition/manuscript (potentially referenced under
pdf).- annotators
Name/identifier of each person who contributed new labels. If the file contains several types/versions/iterations, specify in parenthesis who did what.
- reviewers
Name/identifier of each person who reviewed annotation labels, potentially modifying them. If a review pertained only to a particular type/version/iteration, specify in parenthesis which one.
- harmony_version
Version of the DCML harmony annotation standard used, e.g.
2.3.0.
Reconciling metadata with Wikidata
Wikidata is a knowledge graph in which
each node (a noun considered as subject or object of a relation) is identified by a “Q-number” such as
Q636399(the song “Smoke on the Water”),each edge (a verb or property) by a “P-number” such as
P921(the property “main subject”, in this example pointing to the node Q81085137).
Reconciling metadata with Wikidata means linking values to nodes in the graph by assigning the relevant Q-numbers,
which can be comfortably achieved with the software OpenRefine <https://openrefine.org/>. As an example,
we take the insufficiently populated metadata.tsv from the Annotated Beethoven Corpus version 2.1
(link).
The goal of this step-by-step guide is to reconcile the composer and his 16 string quartets with Wikidata.
Creating a new OpenRefine project
As a first step, we need to make sure that our metadata table contains values that OpenRefine can reconcile with Wikidata’s node labels. Here, we can use the file names and some regular expression magic to fill the columns:
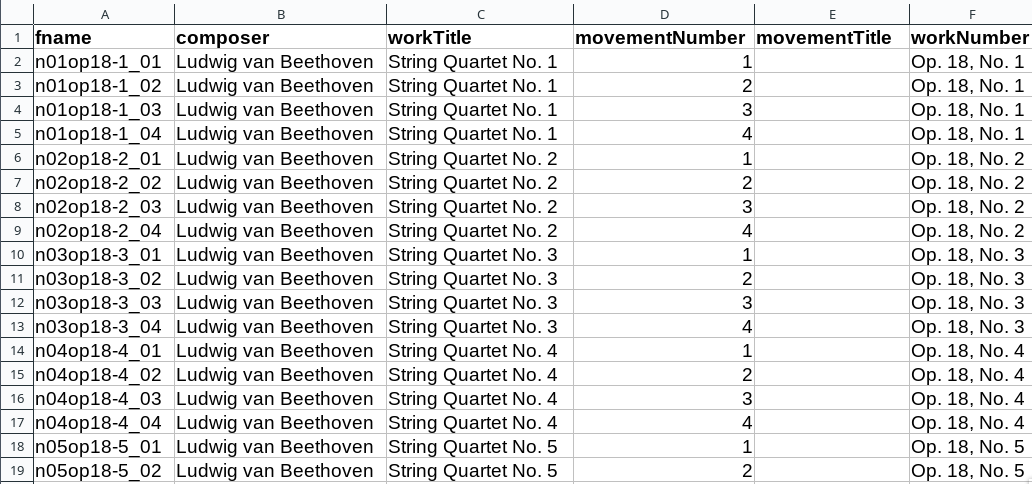
ABC metadata.tsv with populated composer, workTitle, movementNumber, and workNumber columns.
Next, we load the file into OpenRefine, click on Next », check the preview, adapt the setting for loading the
TSV file if needed (usually it isn’t), name the project and click on Create project ».
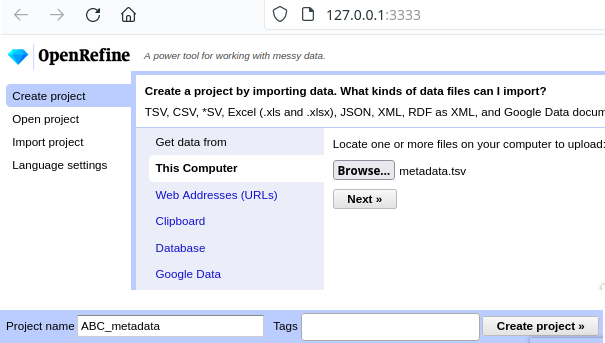
Creating a project by loading the metadata.tsv file into OpenRefine.
Reconciling a column
Now we can start reconciling the values of a column by opening it’s menu Reconcile -> Start reconciling....
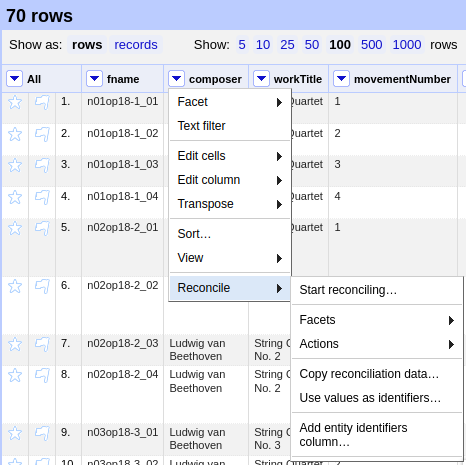
Opening the reconciliation pane in OpenRefine.
The upcoming pane has a list of services on the left side that should include at least Wikidata (en), which is
what we click on. OpenRefine tries to guess the item type that the values could be matched with and correctly suggests
Q5 (human). Since the correct type Q5 is already selected we can go ahead with Start reconciling.... Once
the process is complete, a new facet appears on the left side that lets us view the different types of match results.
In this example, all 70 movements have type none and we need to pick the correct item that corresponds to the
composer in question.

Selecting the corresponding Wikidata item to automatically assign it to all cells.
Sometimes, OpenRefine does not suggest any item. In this case, supposing an item does indeed exist, we can go to
the column’s menu Reconcile -> Actions -> Match all filtered cells to... and manually search for the item.
Once everything has been correctly matched, we can automatically create a new column to store the Q-numbers.
This is as easy as accessing the column menu Reconcile -> Add entity identifiers column.... When asked for the
new column name, we use the
QuickStatements CSV logic which boils down to
thinking of each row as the subject of a (subject, verb, object) triple, and storing object Q-numbers in
verb columns. In this example, we are storing Q-numbers that correspond to the pieces’
‘composer’ property and therefore we name the new column
P86 (composer):
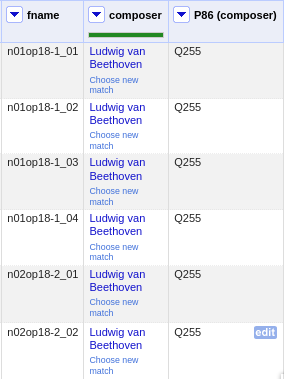
Metadata table with the newly created column P86 (composer) pointing to the matched Q-number(s).
The result can now easily written back to the original file using the menu Export -> Tab-separated value in order
to then insert the new values into the MuseScore files. Please make sure to check the diff of the updated
metadata.tsv before committing to prevent committing unwanted changes or, even worse, having them written
into the scores.
Reconciling the workTitle column
Many Wikidata items can be expected to bear labels such as String Quartet No. 1 and therefore there is quite some
ambiguity involved in matching. Since we have already reconciled the composer column, we can use it to constrain
the reconciliation of the workTitle column to pieces that have been composed by Beethoven.
To achieve that, we bring up the reconciliation pane and, once more, OpenRefine correctly infers the type of the
items that we are trying to match, Q105543609 (musical work/composition). On the right side, we assign the
property P86 (composer) to the composer column by typing composer and selecting the correct property.
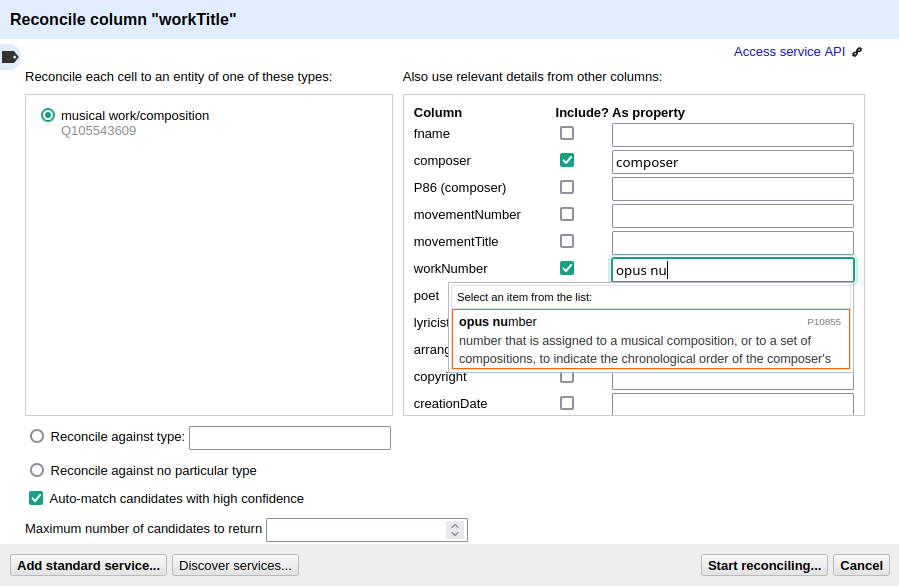
Matching the workTitle column constraint by the reconciled composer column.
In this case, we can try to additionally use the workNumber column. This makes sense without prior reconciliation
because the corresponding property P10855 (opus number) has a literal data type, string. In other words,
Wikidata users populate this property with free text rather than with a Q-number. We cannot be sure that the property
is present at all and, if it is, whether the strings follow a consistent format. Another source of inconsistency
could be a confusion with P528 (catalog code),
as discussed here.
In an ideal world we would not only consume metadata from the knowledge graph but also help cleaning it up for our
domain…..
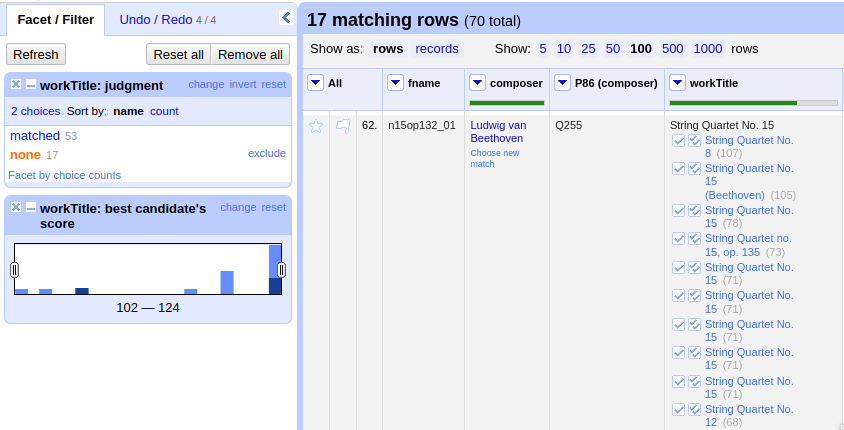
Matching Beethoven string quartets with the correct Wikidata items.
The screenshot shows that 53 were matched automatically and 17 are ambiguous. In theory we could automatically
match them based on their match score but, as we can see, this would wrongly match our String Quartet No. 15
with the item Q270886 (String Quartet No. 8), meaning we need to go through the works and select the right match
carefully. However, once we have matched No. 15 with the correct item and see that for the other ambiguous pieces
the correct items have the highest match score respectively, we can use the
Reconcile -> Actions -> Match each cell to its best candidate shortcut to finalize the task.
Note
In the name of thoroughness, we also need to take a look at the automatically matched items to avoid false positives.
Pulling additional information
Obviously, with all cells having the same composer value we would have been faster to create the P86 (composer)
column manually, filling in the value Q255 for all cells. But using
OpenRefine gives us the advantage that, once reconciled, we can pull additional information on the composer item
from the Wikidata knowledge graph. For that we simply access the matched composer column’s menu
Edit column -> Add columns from reconciled values which will lead us to a list of properties that we can simply
click on to create additional columns. For example, we can easily add columns called
“country of citizenship”, “native language”, “place of birth”, “place of death” and “religion or worldview”.
This step can be repeated for the added columns. The screenshot shows the column country that was created by
pulling the property P17 (country) for the Electorate of Cologne items. In addition the columns
MusicBrainz work ID, publication date, tonality, and IMSLP ID have been created from the
reconciled work IDs.
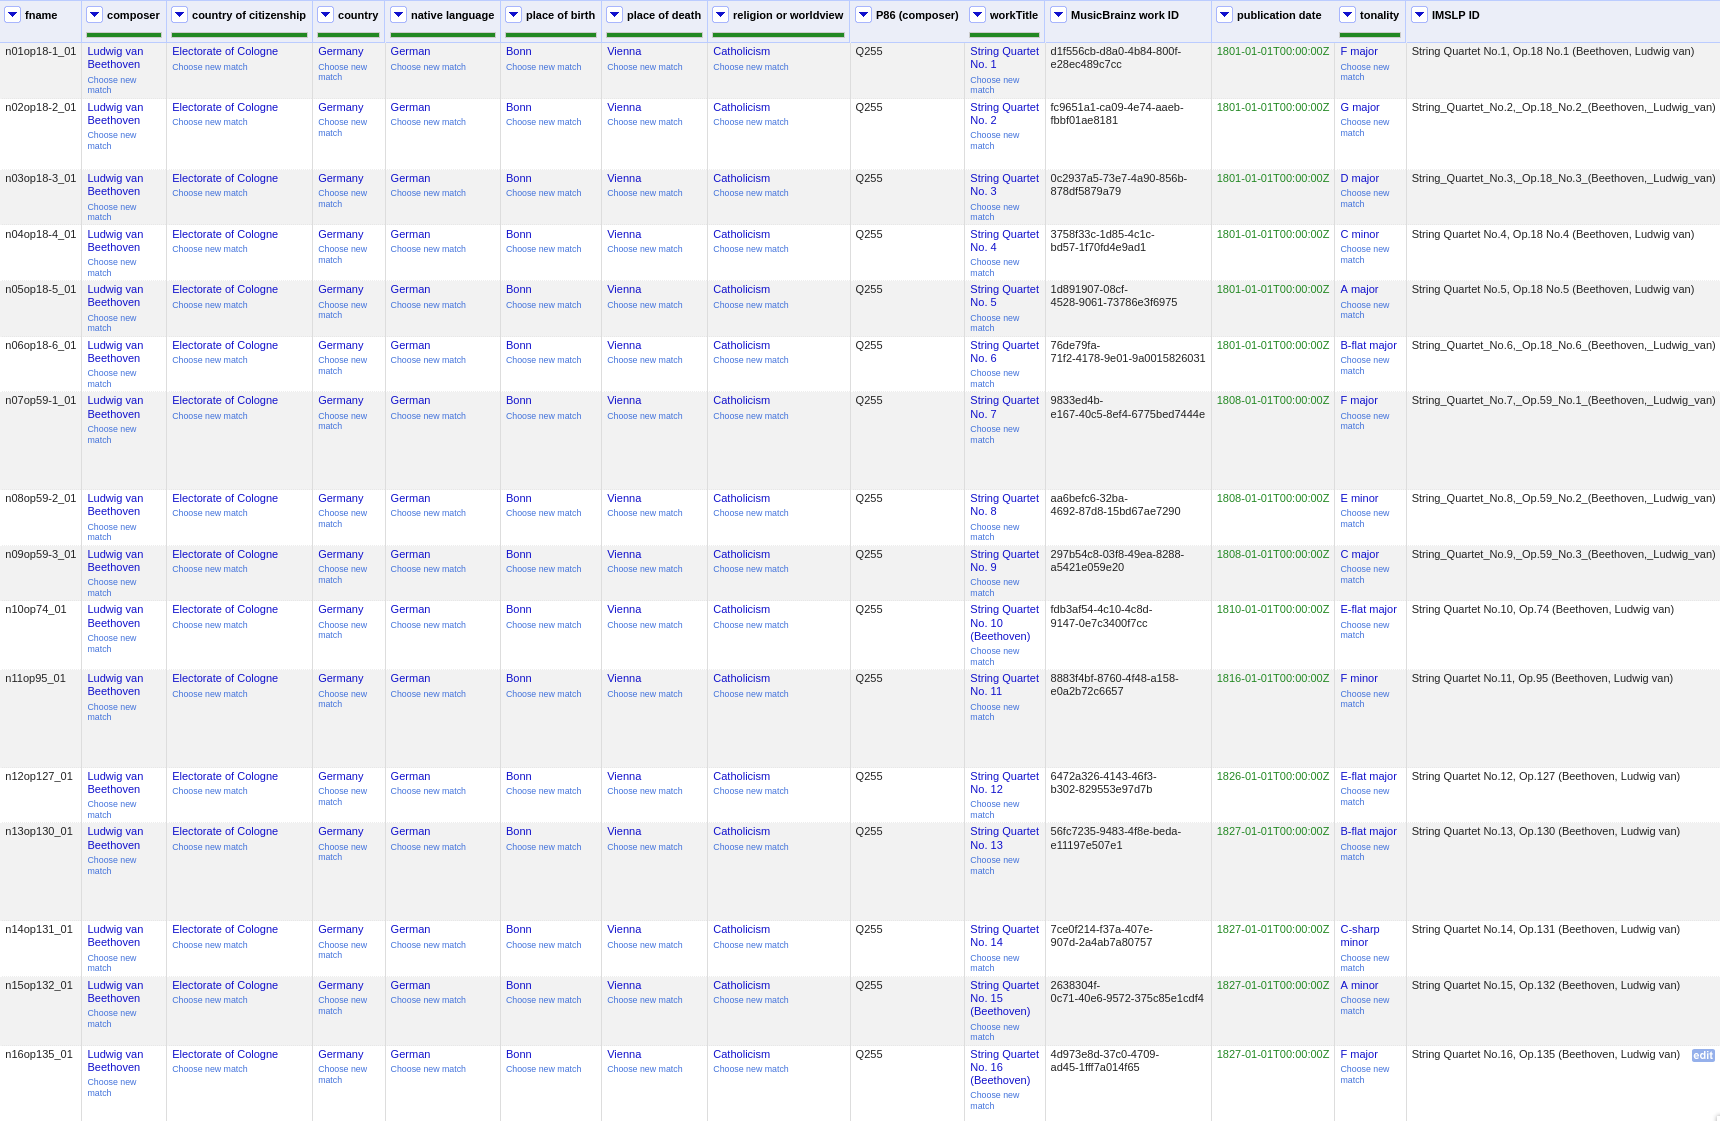
Additional columns pulled from the Wikidata knowledge graph based on the reconciled composer items; displayed for the 16 first movements.
After exporting the newly gained values to our original metadata.tsv, we can process them further, for example,
by turning the publication dates that come in ISO format into our default composition year columns which contain only a year number;
by integrating the values in the
tonalitycolumn into theworkTitlecolumn (to get something along the lines ofString Quartet No. 1 in F major, for example);by renaming the column
IMSLP IDto its default nameimslp;by using the column
MusicBrainz work IDfor automatically retrieving IDs for the individual movements for our default columnmusicbrainz; as well as values for the columnmovementTitle, for example.
Future work: Sub-work-level items
Wikidata has a simple mechanism for linking a work to its parts, such as movements. Consider for example the item
for Joseph Haydn’s Trumpet Concerto in E-flat major, Hob. VIIe:1, Q1585960.
The property P527 (has part(s)) links it to the three items that represent its three movements, each of which is
linked to its parent item via P361 (part of). The problem is that in the majority of cases, such sub-work-level
items do not exist yet. MusicBrainz work IDs, on the other hand, are often available (because they are required
to identify CD tracks). Once we have reconciled our scores representing individual movements with Wikidata work IDs,
it would be actually a small step to go ahead and create items for the movements automatically via OpenRefine.
We should consider doing this at least for the cases where sub-work-level IDs are already available on
MusicBrainz. We could also consider to link the items to our scores in one go.
Finalizing a repository for publication
This section describes some of the steps that might be necessary to clean up a repository and make it presentable to
the public. Rather than a fixed sequence of steps, this process is driven by the expected shape and completeness
allowing the repo to qualify as uniform with other published DCML corpora. It requires knowledge of the commandline,
very good familiarity with git, and experience with using ms3 commands.
This section is from July 2023 and coined to the particular case where a long range of repos need to be (carfully)
updated with new filenames & additional JSON metadata files generated by the bleeding-edge ms3 version 2. It
requires being able to use both the old ms3 1.2.12 and the latest version in alternation, e.g. using virtual
environments or pipx (see below). To date, it also requires access to DCML’s private repos.
In a nutshell:
All currently ongoing work needs to be finalized first before the repo itself can be finalized.
(Work package type
Harmonize repo structure & versions) The repository structure needs to be checked and updated if necessary. Once the PR is merged, the remaining two work packages can be addressed in parallel:(WP type
Eliminate warnings) All warnings need to be eliminated and(WP type
Metadata) the metadata needs finalizing.
Note
As a general principle, whenever you discover an oddity concerning a repository and/or a particular score which will need to be fixed at a later point, please create a concise issue making ample use of screenshots. This does not include anomalies that are covered by a WARNING message.
As a running example, let’s consider this pre-clean commit of peri_euridice.
Finalize ongoing work
0. Check OpenProject
If there are work packages for this repo, we should make sure that all of them have been marked as “Done”.
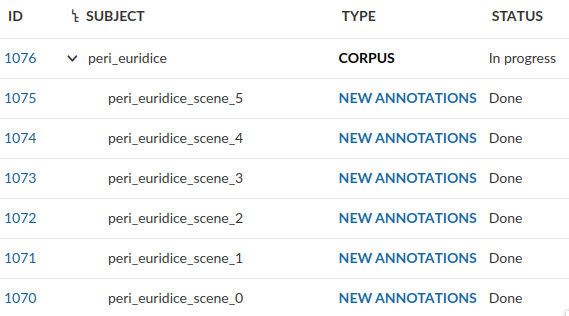
Screenshot from OpenProject showing that all work packages for the repo have been marked as “Done”.
1. Addressing open Pull Requests
If there are open PRs, we need to check their nature and ping the people involved, asking them for progress.
2. Check for unmerged branches
By first clicking on # branches and then on All branches, you see the current state of affairs:
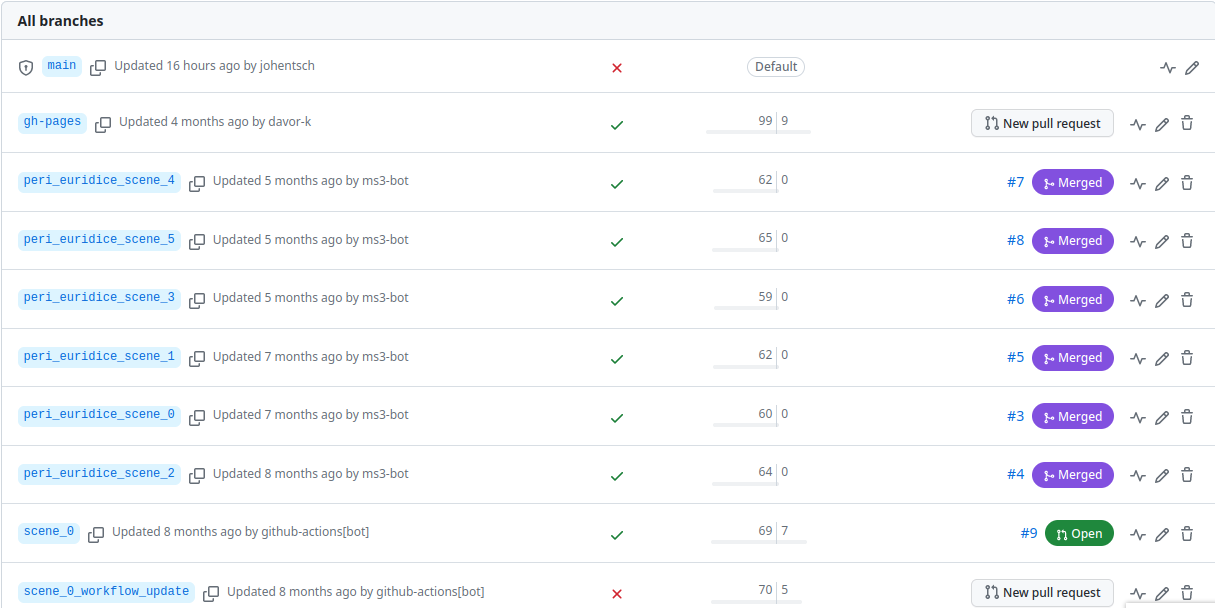
Screenshot from GitHub showing that there are few stale branches and some that have not been merged, including one open PR.
The little bar charts show, towards the left, by how many commits a branch is behind main and, towards the right,
by how many commits it is ahead of main. If the latter is larger than zero, this branch contains work in progress
that has not been merged yet!
Here is how the branches are to be cleaned up:
The branch
gh-pagesneeds to be ignored entirely and left as it is!All branches that are not ahead of
mainshould be deleted at this point. This is the case for the six branches showing that their PR has been merged, their bar charts show zero on the right side.If there is still a branch with a PR “Open”, as in the example, that means we haven’t done step 1 yet, i.e., we need to get all PRs finalized (after merging, the branch can be deleted).
If there are other branches with work in progress (in the screenshot,
scene_0_workflow_update), we need to be extra careful to take the right decision and to check with the author(s). Several scenarios are possible:They are still working on it and we should wait for their work to be reviewed in a PR and then merged.
The commits are irrelevant and the branch can be deleted.
The commits have been rebased onto another branch and merged into
mainfrom there. Rebased commits have other hashes than their originals so GitHub would not recognize if this the case. That’s why it is important to remove an original branch if it has been rebased and merged.
This step is completed once we are left with the branches main and gh-pages only.
Update repository structure
The short version
git checkout main && git pull
git checkout -b repo_structure
ms31 extract -M -N -X -F -C -D
git add . && git commit -m "ms3 extract -M -N -X -F -C -D (v1.2.12)"
git tag -a v1.0 -m "Corpus fully annotated and extracted with ms3 v1.2.12 before finalizing it for publication"
git rm -r .github && git commit -m "removes annotation workflow"
git rm -r tonicizations && git commit -m "removes tonicizations"
git rm warnings.log && git commit -m "removes warnings.log"
Manually remove the folders reviewed, measures, notes, and harmonies which will be replaced in the
following (don’t commit the deletion separately).
ms3 review -M -N -X -F -C -D -c LATEST
git add . && git commit -m "ms3 review -M -N -X -F -C -D -c LATEST (ms3 v2.5.4)"
git push --atomic
All steps in this section are to be performed locally and, once completed, to be merged through a reviewed PR. This
section requires using two different versions of ms3, namely the latest 1.x version, ms3<2.0.0, and the latest
2.x version, ms3>2.0.0. This can be achieved by using virtual environments. One very practical solution to this,
which we use in this documentation, is through the pipx package. It lets us install the old version in parallel,
by adding a suffix to the command, so we have both versions available without having to switch environments.
After installing pipx, we use the following setup:
pipx install --suffix 1 "ms3<2.0.0"
pip install -U ms3
This lets us use the old version as ms31 and the new one as the “normal” ms3. We can check our setup via
pipx list
# Output
# package ms3 1.2.12 (ms31), installed using Python 3.10.11
#  - ms31
And we can test the commands like this:
ms31 --version
# Output: 1.2.12
ms3 --version
# Output: 2.4.1
Note
Please upgrade your ms3 frequently to the latest version of ms3 version 2 by executing
pip install -U ms3.
3. Re-extract everything and create a version tag
Note
Version tags are attached to one particular commit and can be used instead of the commit SHA to refer to it.
This is particularly useful in the present context when the ms3 review command is called with the
-c [GIT_REVISION] flag which allows us, for example, to create a comparison between the current version and
the version tagged “v1.0” by calling ms3 review -c v1.0. In most cases, we want to compare with the latest
preceding tag for which we can use the shorthand ms3 review -c LATEST.
Now that there is no work in progress is the perfect time for creating a version tag in order to describe the current
status of the repository for future reference. The documentation assumes that you have checked out and pulled main.
From here, we create the new branch, e.g. “repo_structure”, which will take all commits added in the following sections.
3a) Re-extract everything
Before we pin a version number to the current state of the repository, and before updating it with ms3 v2, we extract the default TSV facets one last time with ms3 v1 by executing
ms31 extract -M -N -X -F -C -D
(for measure, notes, expanded, form, and metadata). Please make sure that the folders notes and measures
contain the same number of TSV files as the folder MS3 contains MSCX files and that the metadata.tsv contains
that same number of rows (plus one for the column headers). If this is not the case, please refer to the first point
under metadata.tsv and/or ask on Mattermost how to proceed.
Then we commit everything with the message "ms3 extract -M -N -X -F -C -D (v1.2.12)"
(assuming that the latest v1 is v1.2.12).
3b) Assign a version tag
The syntax is
git tag -a <version> -m "<description>"
Every version number has the form v<ms3>.<counter>, which means it
starts with a “v” (for “version”)
is followed by the major version of ms3 used to extract the data (i.e., “0” for ms3<1.0.0, “1” for versions 1.0.0 - 1.2.12, and “2” for versions >= 2.0.0)
followed by a dot
and a monotonic counter starting from 0 that is incremented by one for every new version.
In the default case, right now, the current version has been extracted through the workflow with ms3 version 1.
If you want to be sure you can either
check the column
ms3_versioninmetadata.tsv, orthe file extensions of the TSV files: Starting with version 2, they include the facet name such that, for example, all files in the folder
notesend with.notes.tsv. If this is not the case, as is expected, the new version should start with “1”.
In order to find out the next version number, we need to look at the existing tags. We can see the full list with
git tag -n
And we can see the latest version with
> git describe --tags --abbrev=0        # for the tag only
v2.0
which will output “fatal: No names found, cannot describe anything.” if there are no tags yet. Depending on the output we assign:
v1.0if there are no tags yet or only tags starting with “v0”v1.1if the latest tag isv1.0v1.10if the latest tag isv1.9etc.
We assign the tag to the current commit together with a message (just like in a commit), for example
git tag -a v1.0 -m "Corpus fully annotated and extracted with ms3 v1.2.12 before finalizing it for publication"
git push --tags
The second command pushes the tag to GitHub (but we don’t create the Pull Request yet, only after step 5).
Please note that this specification has been newly added (July 2023) and you may encounter a repository that has already a version above “v1”: In such a case, please discuss with DCML members how to proceed.
4. Remove the automated GitHub workflow and all deprecated files
Now that we have pinned the version, we can start streamlining the repository structur.
During finalization we will be performing the workflow tasks manually
using the ms3 review command. So we want to first
deactivate the GitHub actions by simply removing the folder .github (using the command git rm -r .github)
and committing the change.
Important update (September 2023)
At this point, it is important to prevent the automatic re-installation of the workflow by the automatic
workflow_deployment. The relevant change needs to be committed
to the main branch of this repo and consists in deleting a value in the file all_subcorpora.csv, namely:
in the row corresponding to the corpus repository in question
removing the value in the column
workflow_version;in case the workflow is to be automatically replaced with the lastest workflow version, instead of removing the value, the cell should be overwritten with the value
latest.
Then we streamline the repository to harmonize it with the other ones. By default, every repo should come with the files
README.mdmetadata.tsv
and with the folders
MS3harmoniesmeasuresnotespdfreviewed
each containing one file per row in metadata.tsv (with the exception of pdf which often includes fewer files).
If form annotations are present, the repo will also have a form_labels folder. Apart from that,
some repos might also include some of the following files:
.gitignoreIGNORED_WARNINGS
They should be left untouched.
Things to be removed, if present (one commit for each list item):
the folder
tonicizationstop-level files ending on
.login the
MS3folder: Files ending on_reviewed.mscx(in the Peri case here there were two of them).
Once again, you can use git rm <file> and git rm -r <folder> and commit each deletion separately.
For all other things, please ask on Mattermost before deleting.
The command sequence used in the present Peri example:
git rm MS3/*_reviewed.mscx
git commit -m "removes superfluous _reviewed files"
git rm -r .github
git commit -m "removes annotation workflow"
git rm warnings.log
git commit -m "removes warnings.log"
git rm -r tonicizations
git commit -m "removes tonicizations"
5. Update the extracted files to ms3 version 2
Note
Annotators are familiar with the comparisons between labels in the _reviewed.mscx files in the reviewed
folder. So far, these comparisons have been used, rather ineffectively, to display the differences from one push
to another in the same pull request. Now, August 2023, we are starting to make better use of this principle, by
accumulating all differences between the current set of labels and those at the time of the last version tag.
In the future, this will become part of the semi-automated DCML annotation workflow, but, for now, we achieve this
by passing the flag -c to the ms3 review command (which, in return, passes it to ms3 compare in the
background). Without passing a Git revision to the flag, the comparison would be performed against the set of TSVs
currently present in the harmonies folder (which was what happened during a PR with annotation labels). In the
present context, however, we want to pass a git revision, which could be a commit SHA (full or shortened), a branch
name, Git sugar such as HEAD~2 (two commits before the current one), or, importantly, a tag.
With the repo readily streamlined we update the data to ms3 v2 in three steps:
First, we delete the folders
reviewed,measures,notes, andharmonies(and any other facet folders that might be present, such asform_labels), without committing the change (e.g., in your file browser).Then we find out (or remember) the latest v1.x version tag, let’s assume its
v1.0, and runms3 review -M -N -X -F -C -D -c LATEST.commit everything with the message
"ms3 review -M -N -X -F -C -D -c LATEST (ms3 v2.5.4)", i.e., the command you have executed, followed by the ms3 version number that was used.
The review command will also create .warnings files in the reviewed folder which reflect the health of the
dataset.
The branch is now ready to be reviewed and then merged through a Pull Request:
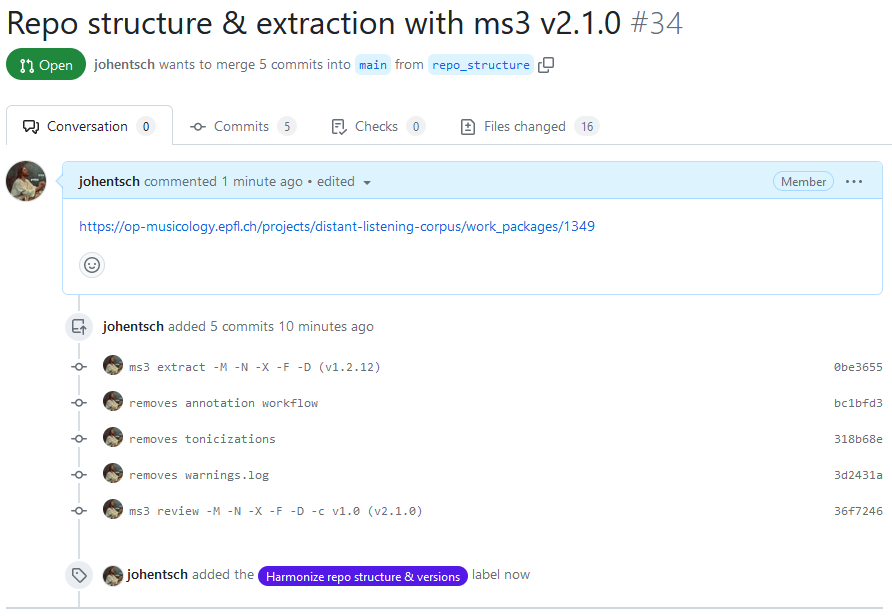
Screenshot showing a Pull Request harmonizing the repository by deleting and updating files. Note that the description links the PR to the work package on OpenProject and that the label corresponds to the work package type.
Once the PR has been created, you can update the work package status to “Needs review”.
Only when the PR has been reviewed and merged can we proceed with either metadata cleaning or eliminating warnings.
The person who merges should then assign a new version tag,
e.g. git tag -a v2.0 -m "Extracted facets using ms3 version 2.4.1".
Eliminating all warnings
Note
Please keep in mind that the validator is simply a tool for detecting potential problems. If you have checked a particular place and found that the warning is not justified, please add it to the IGNORED_WARNINGS file, followed by a concise comment, which can replace the indented warning text following the header that includes the logger name, but must begin each new line with a TAB. The comment should clarify for future readers why the warning is ill-founded. If you are not sure, please ask on Mattermost. Over the course of time and based on these questions, we will complete this section with concrete instructions on how individual warnings should/can be addressed (and/or fix the validator).
This work package, once again, is addressed by committing to a single branch which is to be merged via a reviewed pull request. The status transition works the same way, i.e.
accept package –>
In progresscreate PR –>
Needs reviewcollaborator reviews & merges –>
Done
This work package, normally, is made available only after finalizing the repo structure, that is, there should be
some v2.x tag. By eliminating all warnings we are creating a new version and want all changes applied to the labels
to be reflected in the _reviewed.mscx files (as mentioned in the info box above). Hence,
whenever we call ms3 review (which will be a lot), we need to pass the current version tag to the -c flag
(e.g. -c v2.0). The documentation will therefore say -c <version tag> where we fill in the latest version tag.
This we can easily retrieve using git describe --tags --abbrev=0. For convenience, however, you ccan also opt for
using -c LATEST which retrieves the latest tag for you automatically.
Since the repository has been updated with ms3 version 2, only this version should be used for the remaining tasks.
The first step is to create a new branch for the task, e.g. “warnings” and to update the current state of warnings by
using
ms3 review -M -N -X -F -C -D -c <version tag>(or-c LATEST) andcommitting the changes (if any) with the message
ms3 review -M -N -X -F -C -D -c <version tag> (ms3 v2.5.4), i.e., the command you have executed, followed by the ms3 version number that was used.
Our goal is to eliminate the presence of any file ending on .warnings in the reviewed folder (they are simple
text files). The review command stores occurring warnings in one such file per piece and deletes those files where all
warnings have been dealt with. In other words, when no <piece>.warnings is present, we’re done already (if, however,
you spotted a warning in the output of the review command that wasn’t captured, that’s probably a bug, please let us
know).
Otherwise, we need to fix the warnings one after the other. For more detailed instructions, please refer to the What to do about the warnings? section of the annotation workflow. To quickly sum it up, there are three ways to deal with a warning:
Fix it, execute
ms3 review -M -N -X -F -C -D -c <version tag> -i <filename>to see if it has disappeared, and commit all changes at once.Declare it a false positive.
Create an issue to make sure someone deals with it later.
Proceed that way until all .warnings files are gone (or contain only warnings that you have created an issue for)
and then open a Pull Request for review.
Note
When fixing other people’s labels, please try to intuit the solution that integrates optimally with the analytical context, i.e. the surrounding labels, rather than what you think would be the optimal solution, because that would probably entail a complete review to ensure a consistent set of labels. The purpose of this work package is mainly to get rid of typos and blatant inconsistencies.
A typical example
The file peri_euridice_scene_1.warnings looks as follows:
Warnings encountered during the last execution of ms3 review
============================================================

INCOMPLETE_MC_WRONGLY_COMPLETED_WARNING (3, 46) ms3.Parse.peri_euridice.peri_euridice_scene_1
  The incomplete MC 46 (timesig 3/2, act_dur 1/2) is completed by 1 incorrect duration (expected: 1):
  {47: Fraction(3, 1)}
FIRST_BAR_MISSING_TEMPO_MARK_WARNING (29,) ms3.Parse.peri_euridice.peri_euridice_scene_1
  No metronome mark found in the very first measure nor anywhere else in the score.
  * Please add one at the very beginning and hide it if it's not from the original print edition.
  * Make sure to choose the rhythmic unit that corresponds to beats in this piece and to set another mark wherever that unit changes.
  * The tempo marks can be rough estimates, maybe cross-checked with a recording.
DCML_NON_CHORD_TONES_ABOVE_THRESHOLD_WARNING (19, 64, '1/2', 'VIIM7') ms3.Parse.peri_euridice.peri_euridice_scene_1
  The label 'VIIM7' in m. 62, onset 1/2 (MC 64, onset 1/2) seems not to correspond well to the score (which does not necessarily mean it is wrong).
  In the context of G.i, it expresses the scale degrees ('7', '2', '4', '#6') [('F', 'A', 'C', 'E')].
  The corresponding score segment has 0 within-label and 2 out-of-label note onsets, a ratio of 1.0 > 0.6 (the current, arbitrary, threshold).
  If it turns out the label is correct, please add the header of this warning to the IGNORED_WARNINGS, ideally followed by a free-text comment in subsequent lines starting with a space or tab.
DCML_NON_CHORD_TONES_ABOVE_THRESHOLD_WARNING (19, 72, '3/2', 'V') ms3.Parse.peri_euridice.peri_euridice_scene_1
  The label 'V' in m. 70, onset 3/2 (MC 72, onset 3/2) seems not to correspond well to the score (which does not necessarily mean it is wrong).
  In the context of G.i, it expresses the scale degrees ('5', '#7', '2') [('D', 'F#', 'A')].
  The corresponding score segment has 0 within-label and 2 out-of-label note onsets, a ratio of 1.0 > 0.6 (the current, arbitrary, threshold).
  If it turns out the label is correct, please add the header of this warning to the IGNORED_WARNINGS, ideally followed by a free-text comment in subsequent lines starting with a space or tab.
DCML_NON_CHORD_TONES_ABOVE_THRESHOLD_WARNING (19, 94, '0', 'III6') ms3.Parse.peri_euridice.peri_euridice_scene_1
  The label 'III6' in m. 92, onset 0 (MC 94, onset 0) seems not to correspond well to the score (which does not necessarily mean it is wrong).
  In the context of G.i, it expresses the scale degrees ('5', '7', '3') [('D', 'F', 'Bb')].
  The corresponding score segment has 1 within-label and 2 out-of-label note onsets, a ratio of 0.6666666666666666 > 0.6 (the current, arbitrary, threshold).
  If it turns out the label is correct, please add the header of this warning to the IGNORED_WARNINGS, ideally followed by a free-text comment in subsequent lines starting with a space or tab.
INCOMPLETE_MC_WRONGLY_COMPLETED_WARNINGIt turns out that the inconsistency is due to an unconventional, not to say wrong, modernisation of the metric structure. Since we are not going to fix this right now, we create an issue describing the warning, potentially suggesting a fix, depending on how deep we have looked into the matter. This means that the
.warningsfile will persist with this warning and later in the pull request we mention the issue (by typing#12in this case) to explain why the .warnings file still exists.FIRST_BAR_MISSING_TEMPO_MARK_WARNINGVery frequent warning. We fix it by adding one or several Metronome marks. As with all warnings, we save the changed .mscx file, run
ms3 review -M -N -X -F -C -D -c LATEST -i scene_1and, if the warning has disappeared, we commit all changes at once with a message such as “adds metronome mark to first measure” or “eliminates FIRST_BAR_MISSING_TEMPO_MARK_WARNING” (i.e., no need to mention thatms3 reviewwas used).DCML_NON_CHORD_TONES_ABOVE_THRESHOLD_WARNING (19, 64, '1/2', 'VIIM7')As we learn from the warning, the label
VIIM7of G minor does not match the notes in the score. It turns out thatVIM7was meant, so we fix the label, save the file, runms3 review -M -N -X -F -C -D -c LATEST -i scene_1and commit everything with a message as we would find it in an annotation review, e.g. “62: VIIM7 => VIM7”. The files that would typically be modified in such a commit, apart from the score, includethe TSV file in
harmonies(changed label)the
.warningsfile inreviewed(removed warning)the
_reviewed.mscxfile (removed label in red, new label in green, notes colored differently or not anymore)the
_reviewed.tsvfile with the updated note colouring reportif your version of ms3 is newer than that of the last extraction, this will also be reflected in
metadata.tsvand severalresource.jsonmetadata files.
DCML_NON_CHORD_TONES_ABOVE_THRESHOLD_WARNING (19, 72, '3/2', 'V')Same as above. Should have been
V/VII.DCML_NON_CHORD_TONES_ABOVE_THRESHOLD_WARNING (19, 94, '0', 'III6')With this warning we demonstrate how to fix a warning that cannot be viewed as false positive, but without having the change escalate into a full review of the piece.

Screenshot showing
peri_euridice_scene_1.mscx, mm. 91-93. The label in question isIII6.¶IIIin G minor expresses a B major harmony. The music in m. 92 can be interepreted as the beginning of a B major - F major pendulum (continued in the following bar, not shown). In that sense, the label is inconsistent in that it covers the entire first half of the bar. At this moment one might be tempted to suggest some different interpretation of the passage but one should resist it: Otherwise one would have to read through the entire analysis and perform a full review lest one introduces a new inconsistency. Instead, we content ourselves by introducing aV/IIIon b. 2, which seems to be the least controversial solution that consistently integrates with the given context and resolves the warning (“m. 92, b. 2: introduces V/III as minimally invasive fix of the DCML_NON_CHORD_TONES_ABOVE_THRESHOLD_WARNING”).If, in addition to this fix, the whole passage strikes us as far-fetched, we could create an issue, potentially assigning the original annotator to it.
Finalizing the metadata
This last and important step has a lot of overlap with Curating and enriching metadata above. That is because metadata can (and should) be added at any given point in time.
If you’re lucky, the repository has been created using the DCML corpus creation pipeline documented here and the metadata is already in a good state. However, quite a number of repositories have been created before the inception of this pipeline and have to be brought up to speed.
This section is currently (September 2023) focused on roundabout 20 repositories that have a long and pretty wild history (which does not always involve a lot of metadata love, unfortunately) so that this task may involve a considerable amount of detective’s work, digging through commit histories to find out the origin of a file, comparing a score with one found on musescore.com to discover its original source, etc. The golden rule is: Everything is allowed as long as it contributes to a better presentable dataset.
The finalization focuses on the following aspects:
The metadata.tsv file and the corresponding metadata fields in the MuseScore files it describes.
The Score prelims and instrumentation, i.e. the header presenting a movement’s title, composer, as well as the instruments assigned to each staff (likewise manageable through the
metadata.tsvfile).The README.md with some standardized general information and some corpus-specific text blobs.
The all_subcorpora.csv file that is used to automatically deploy a corpus-specific website based on filling a homepage template with the values in that table.
Once a repository is made public, it will additionally undergo the Zenodo integration and receive a
.zenodo.json file.
metadata.tsv
Please make sure that the fields documented above under Curating and enriching metadata are filled to the best possible extent. For quick reference:
- Check that
metadata.tsvcontains exactly one row per MuseScore file in theMS3folder. Background info: By default,
ms3commands select only files listed in themetadata.tsvfor parsing, which is a mechanism that allows for the inclusion of other, auxiliary or corpus-external scores. To be 100% sure that all files are included we can callms3 extract -D -a. The only case that that cannot be automatically fixed is is whenmetadata.tsvcontains rows pertaining to files that do not exist anymore (for instance when they have been renamed or split). In such a case, please delete the corresponding rows manually.- Bring the file up to date using
ms3 extract -D. Making sure that the TSV file corresponds to the current state of the metadata in the MuseScore files.
- Make your edits to the
metadata.tsvfile, commiting each change individually. For example, add and fill the columns
composed_start,composed_endandcomposed_sourceand commit them with the message “adds composition dates” (or similar).- Once all columns have been cleaned to your satisfaction, update the corresponding fields in the MuseScore files.
For that you execute
ms3 metadata, inspect the changes usinggit diffand, if everything is looking good (e.g., there are no unwanted changes such as newly added but empty XML tags due to a misnamed column), you re-extract viams3 extract -D(which usually results in a re-ordering of manually added columns and commit the changes with the message “writes updated metadata into MuseScore files”, or similar.
Note
Note that the correspondence between columns in metadata.tsv and fields in the MuseScore files relies on
exact string matching. To minimize erroneous mismatches, we use exclusively lowercase for all our custom
(non-default) field names. If you were using a column named PDF instead of pdf, a new column with the
uppercase name would be added, rather than updating the existing, lowercase one. As a consequence, concatenating
this metadata.tsv with the one from other corpora would end up with two different columns for the same thing.
Whenever you discover a misspelled column, you can rename (or remove) it and call ms3 metadata --remove.
This will remove the metadata fields (that is, the corresponding XML tags) for which no corresponding column exists
in metadata.tsv from the MuseScore files.
Score prelims and instrumentation
The prelims are the header of a score that contains information about the piece. In MuseScore, they consist of up to five text fields which can be arbitrarily arranged within the “Vertical box” at the top of the MuseScore file:

The values of these fields are extracted and updated just like the metadata fields. The command ms3 extract -D
writes the values for the existing fields into the columns:
title_textsubtitle_textlyricist_textcomposer_text(
part_text, not used, automatically filled when extracting staves as individual parts such as “Violin II”)
These columns should appear next to each other in the table so you can see if some of them are not present, in which
case you can simply add those that you want to use. Once you have updated the values in question, you commit the change
to the TSV file first and then run ms3 metadata --prelims in order to write the changes into the file.
Usually you can compose these columns from the metadata fields that you have already cleaned in the previous step. For
example, you can simply copy the composer column into composer_text column and commit. The lyricist field is
generally used for vocal music; or in special cases such as the Tchaikovsky piece shown above that comes with a poem.
For a dataset of sonatas, the title column could be composed, for example, by using the CONCATENATE function of
your spreadsheet in order to combine the workTitle column with the workNumber column in some meaningful way.
In general, there are two possibilities to use title and subtitle. When unsure, please ask on Mattermost.
Title for the work, subtitle for the movement. Would be typical for a sonata movement.
Title for the part-of-work, subtitle for the cycle, typical for a cycle (as shown above).
The instrumentation can be changed by filling in default instrument names into the columns for the respective staves,
e.g. staff_1_instrument for the upper staff. The new values are written into the document by running
ms3 metadata --instrumentation.
Once the scores have been updated/created, you will need to open each MuseScore file to check on their visual arrangement because it does not happen automatically. Please do not modify the default font settings (except for restoring the defaults) unless strictly necessary. The arrangement is arbitrary and should be somewhat satisfying visually (again, take the Tchaikovsky example above). Arranging the layout may involve enlarging the vertical box in the vertical dimension.
An example
Note
Quick reminder to load all columns the TSV files as “Text”, preventing the automatic type inference that modern spreadsheets are prone to perform, modifying your data without you noticing.
Let us consider the wagner_overtures @ v2.1 repository.
A glance at the relevant columns of metadata.tsv reveals the following situation:

Metadata columns related to score prelims and instrumentation that need cleaning up.
1. Inspecting the metadata
The
title_textis defined for both pieces, thesubtitle_textonly for the first one, and thecomposer_textis missing for both and therefore does not have a column. (lyricist_textis not needed in this case.) All present values encode typesetting information through HTML tags which we want to get rid off.The two instrument columns have the value “Piano (2)”, which we want to standardize.
2. Update ``metadata.tsv`` & commit
The following image shows the updated values:

Metadata columns related to score prelims and instrumentation after cleaning them up.
inserted a
composer_textcolumn (it does not matter where) and copied the values from thecomposercolumnremoved the HTML tags from the
title_textandsubtitle_textcolumnsas can be seen in the screenshot above, the
title_textcolumn has been fully re-created using the formula=CONCATENATE(V2, ", ", Y2), yielding a concatenation of theworkTitleandworkNumbercolumns. This might seem like an overkill in this two-row example but is very convenient when dealing with larger corpora.Moved the subtitle “Vorspiel” from the
title_textto thesubtitle_textcolumn for the second piece.Changed all instrument values to “Piano” (case insensitive, so “piano” would work as well and would be standardized while updating the MuseScore files).
Commit the changes with a commit message such as “updates metadata.tsv with prelims and instrumentation”.
3. Execute ``ms3 metadata –prelims –instrumentation``

Header of the Meistersinger score before cleaning up prelims and instrumentation.

Header of the Meistersinger score after cleaning up prelims and instrumentation. Font and positions correspond to the defaults.

Header of the Meistersinger Vorspiel after manually adjusting it. See the following section on how to adjust the header to make it more appealing.
4. Inspect and commit
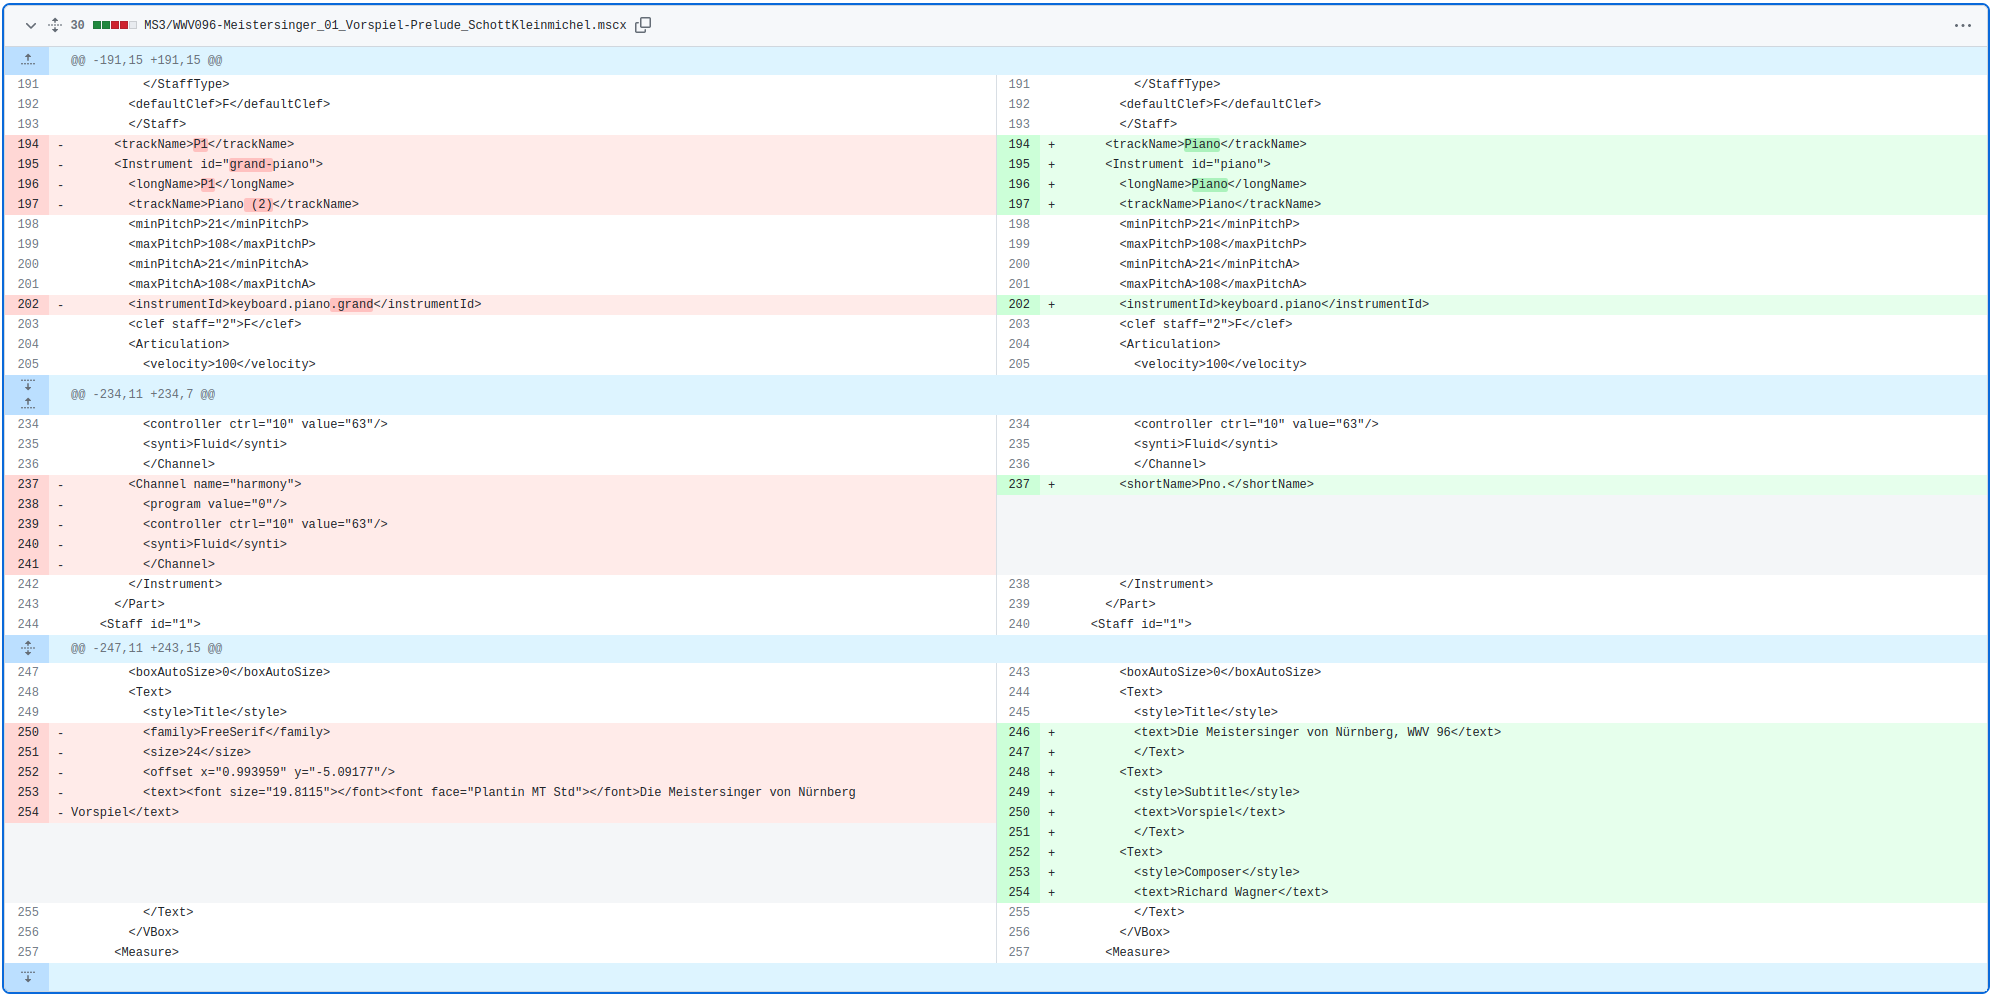
Diff of the MuseScore file corresponding to the changes introduced by ms3 metadata --prelims --instrumentation.
The screenshot is taken from the commit on GitHub.
Check the changes in the MuseScore files by opening them and using git diff and.
Everything is alright if
the score can still be opened in MuseScore 3 without throwing an error message
no serious glitch has been introduced (e.g., a clef was replaced with another clef)
the score is playback with the appropriate instrument sound banks
the diff does not show any suspicious changes that seem uncalled for
It is OK for the header at this point to look a bit wonky, we are going to clean it up in the next section. Suggested commit message: “writes updated prelims and instrumentation into MuseScore files”.
Normalizing score layout
Since we have the scores opened already, we might as well give them a few final brushstrokes to standardize how they look.
Header
Note
Please be sure to adjust the header manually only after filling the fields according to the section Score prelims and instrumentation.
The header of the Meistersinger score in the screenshot above has benefitted from the following manual adjustments:
The vertical box was enlarged vertically (by selecting it and dragging the handle) for it to fit the default prelims. This affects the beginning of the music.
Each score needs to have a metronome marking. This one already had one, but since it’s not part of the original PDF we need to hide it (select and press
Vas in “visible”). Also, most people will intuitively clap in halves to this, so this is also a good moment to replace the metronome mark accordingly.Upon hiding the tempo marking it disappeared completely, which is a sign that
View -> Show invisibleshould be checked for this score so that hidden elements do not go unnoticed.The verbal tempo indication has been completed with the words that were missing from the PDF. Then it was moved closer to the beginning of the music, as well as the metronome marking (even when hidden, its large distance from the music was causing a gap).
These steps uncovered a cascade of other necessities, which is a typical characteristic of the finalization process:
The original PDF had been missing, a good occasion to go find and include it.
Including the PDF from IMSLP involves adding the “reverse lookup” link to the
metadata.tsvfile (see Curating and enriching metadata above). It turns out that the identifiers have not been added to the metadata yet. Having the IMSLP page open already leaves us in a good position to add them on the go.Those for the Tristan score are missing as well and are completed on the fly.
Score layout
Warning
This section is experimental and can be skipped for now. If you take shot, please be extra careful to prevent any unwanted loss of information.
Note
Oftentimes, scores have hidden dynamic and articulation markup which is supposed to represent a more human-like synthetic playback. Please consult with DCML on a case-by-case basis to know whether to keep or remove it (the tendency should be towards the latter to avoid confusion between the official source and added information).
This is a quick routine for resetting the layout of a score to the default values. It is generally a good idea to do so, but one needs to make sure that no information is lost and that no layout atrocities are introduced by the process. So as basic rules:
If any of the steps result in a score that looks worse than before, it should be undone and not committed.
As a security measure, after each step one should execute
ms3 extract -M -N -X -F -C -Dto make sure that no elements have changed during the process, otherwise one should undo and not commit, maybe leaving a note.Each step should be committed individually so that it can be reverted if needed.
However, the same step maybe applied to all scores, and committed (without any changes introduced by
ms3 extract, which should be have occurred either way).
The steps are:
Format -> Style -> Reset All Styles to Default -> OK. Suggested commit message: “resets all styles to default”Format -> Add/Remove System Breaks -> Remove current system breaks -> OK. Suggested commit message: “removes all system breaks”Format -> Reset Text Style Overrides. Suggested commit message: “resets text style overrides”Format -> Page Settings -> Reset All Page Settings to Default. Suggested commit message: “resets all page settings to default”
Integrating the repository with the corpus automatization
As a prerequisite for this section, please clone the DCMLab/workflow_deployment/ repo recursively:
git clone --recursive git@github.com:DCMLab/workflow_deployment.git
In brief, this chore consists in making sure that
the repository is listed in DCMLab/workflow_deployment/all_subcorpora.csv
the columns are filled with values that are appropriate for this corpus (or deliberately left blank).
The cells in this CSV file correspond to template variables that are used to fill in the {{ placeholders }} in
multiple text files. These files are included in the workflow_deployment repository in the form of submodules:
corpus_docsincludes the documentation homepage template that is automatically deployed for each corpustemplate_repositoryincludes (other than the current version of the GitHub workflow) basic skeletons for aREADME.mdand a.zenodo.jsonfile (see further below).
Updating all_subcorpora.csv
For a “normal” corpus, the variables that need to be filled are:
pretty_repo_nameHuman-readable title that appears as first heading in the README and as homepage title, e.g. “Richard Wagner – Overtures” (note the en dash used through the column).example_fnamean example filename (without file extension), generally the one in thepiececolumn ofmetadata.tsv, e.g. “WWV090_Tristan_01_Vorspiel-Prelude_Ricordi1888Floridia”example_full_titlethe full title of the example piece that is implanted into a phrase, e.g. “the “Vorspiel” of Tristan und Isolde” (note the use of restructuredText syntax for italics)
You can take inspiration from already existing entries in other rows, too. Once these are updated, they change can be committed directly to main in this exceptional case. Suggested commit message: “adds template values for <corpus_name>”.
Deploying the homepage
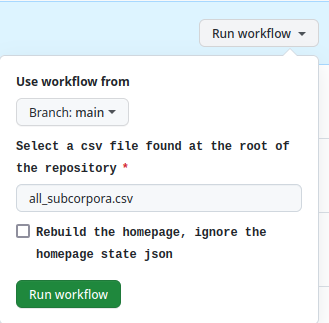
In workflow_deployment/actions select “update_homepage” from the menu on the left or
click here.
Then click on “Run workflow” and then on the green “Run workflow” button. This will iterate through the rows of
all_subcorpora.csv and re-build the homepages where necessary.
Coming back after a few minutes the action has hopefully terminated successfully. To be very sure, you can checkout the
docs branch of the corpus repo and check if the bot has recently pushed files. Then you can go to the GitHub page
of the repo, click on the little cogwheel next to the “About” panel, under “Website”, activate the checkbox
“Use your GitHub Pages website”, and click on “Save changes.” Clicking on the pages link should bring you to the
newly built homepage.
README.md and template filling
Note
TL;DR: Checkout the example PR.
Warning
Note that everything under ## Overview is automatically generated and everything you change beneath will be
relentlessly overwritten!
The README.md file is the first thing that people see when they visit the repository on GitHub. Likewise, it
is the start page of the automatically deployed documentation homepage. That’s why our READMEs follow the same
template, which in the beginning adds a few badgets and generic links explaining this fact for easy navigation.
Often, if you’re cleaning up a README, you’re faced with something like this:
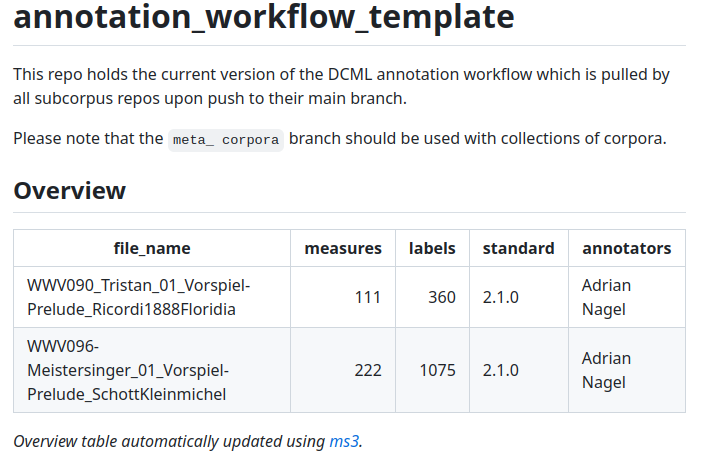
This README.md contains only a template text and an automatically generated overview table.
Everything described in the following could be replaced by editing the README.md manually to achieve the desired result. However, if you find yourself cleaning up the READMEs for multiple repos, you will probably benefit from using the template filling approach.
Filling the templates for multiple repositories
In order to run the template filler script, here’s a very quick setup of a conda environment (assuming you have conda
installed) that you can execute in your clone of the workflow_deployment repository:
conda create -n jinja pip && conda activate jinja
pip install -r src/requirements.txt
Note that there is another requirements.txt file in the root directory of the repository, which has a whole lot
more dependencies, needed for compiling the corpus documentation homepage. Since we don’t need to do this locally,
the src/requirements.txt file contains the bare necessities for executing the template filler. To see if and how
it works, view its help message:
python src/jinja_filler.py -h
Most parameters correspond to columns in the all_subcorpora.csv table; meaning that if you need to fill in the
template_repository/README.md file, for multiple repositories, you might be faster off creating a CSV file,
e.g. subset.csv, by removing irrelevant rows from all_subcorpora.csv and calling
# make sure to fill in and commit all_subcorpora.csv first before creating the subset.csv
python src/jinja_filler.py -csv subset.csv
The first argument to the script, -f defaults to the template_repository folder and will produce one filled-in
folder per row in the CSV file. From there you can go and copy the contents of the README.md file into the README.md
of the corresponding corpus repository, adapting it as needed.
Filling the templates for a single repository
If you need to fill in for a single repo, you might be faster off just passing the arguments for it directly to the script, as in this example:
python src/jinja_filler.py\
    -r bach_chorales\
    -p "Johann Sebastian Bach – The Chorales"\
    -cr v2.0
    # include `-b` if the Zenodo badge ID is known at this point
From here you may want to
create a new branch in the corpus repository,
copy the desired parts of the filled-in README.md file into the README.md of the corresponding corpus repository and commit
adapt it further, filling it with a little bit of life, such as a short introduction to the corpus (the pieces), origin and history, and status of the files, annotations etc.
If the repository has at least one previous version tag and is already public, you may include the following step, the Zenodo integration, in the same branch and Pull Request. Otherwise, please create one just for the README.md. Click here for an example PR.
Zenodo integration
Note
TL;DR: Checkout the example PR.
The Zenodo integration has the purpose of automatically assigning a new DOI for each new version of a copurs that is released on GitHub. In order to activate it, one needs to be the owner of a repository.
Activating the integration for a corpus repository
Being the owner of the repo in question (or admin of the owner organization), on can log into Zenodo with one’s GitHub account and use the menu to go GitHub, a page showing all public repositories with a toggle that shows whether the integration is activated or not.

Zenodo GitHub integration page where the toggle has been set to “on”.
From now on, every GitHub release will be sent to Zenodo and a DOI will be assigned to the new version. This involves
the creation of a new Zenodo record (which includes long-term archival of the data) which requires the presence of a
.zenodo.json file (if we want the record to contain any useful information).
Getting the Zenodo badge ID
The Zenodo badge ID allows to display a blue badge at the top of a repository’s README file that always displays the DOI that has been automatically assigned by Zenodo to the current release (looks like the one in the screenshot below). Please note that the 9-digit ID is not to be confused with the 7-digit end of the DOI itself.
First we create a GitHub release (or have it automatically created by the workflow) and go (back) to the Zenodo overview of our GitHub repositories. Clicking on the repository in question, hopefully, we should see something like this:
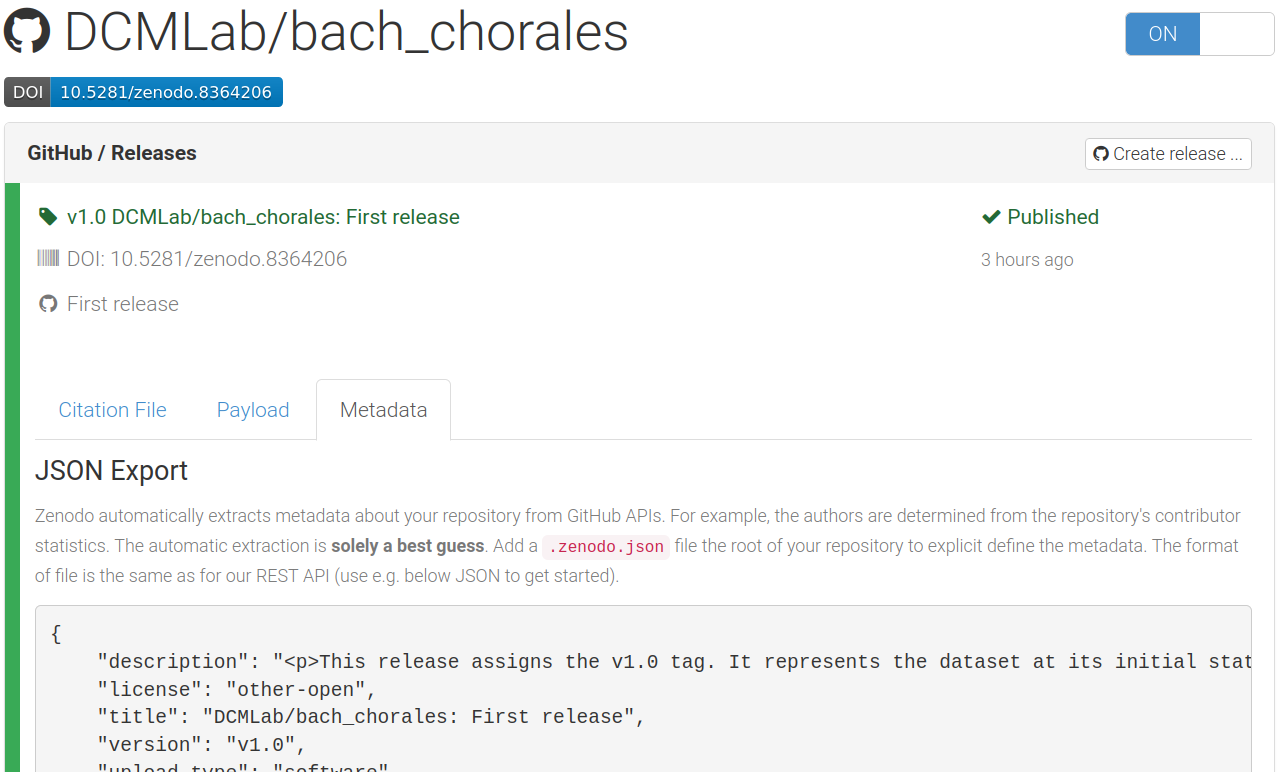
GitHub release successfully integrated into Zenodo with a newly assigned DOI.
The DOI has been successfully assigned and there is a green check saying “Published”. We now can extract the Zenodo badge ID by clicking on the blue DOI badge and copying the 9-digit ID from one of the various fields:
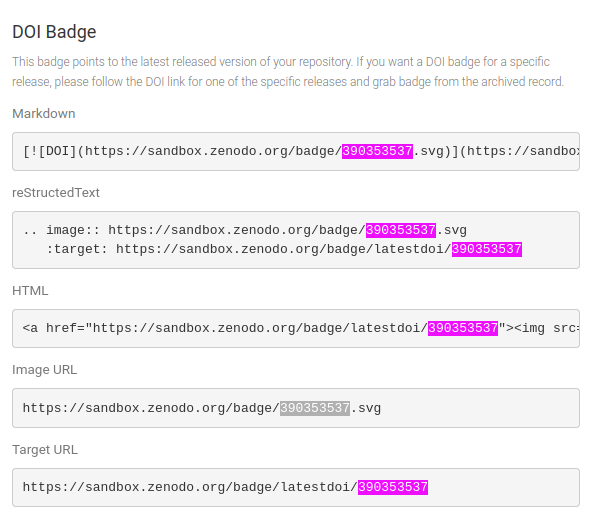
After clicking on the blue DOI badge, this pane shows up, displaying the badge ID multiple times.
We are now able to copy the ID and fill in the last two {{ zenodo_badge_id }} placeholders in the README.md like so:

Replacing the two placeholders in the README.md with the Zenodo badge ID.
Then we also copy it into the corresponding cell of workflow_deployment/all_subcorpora.csv.
Setting up the .zenodo.json metadata file
We have two possibilities:
Either we use the
.zenodo.jsonfile that we get from the using the template filling script above.Or we use the Zenodo form to conveniently edit the metadata and then copy the JSON version generated by Zenodo.
In both cases the contents of the file need to be carefully checked because once information ends up on Zenodo, it quickly propagates throughout the internet and is hard to correct.
Using the ``.zenodo.json`` generated by the template filler
We can copy the file to the top level of the corpus repository and adapt it manually. It is highly recommended to use a text editor with JSON syntax highlighting and validation to avoid failed releases where Zenodo rejects the file (e.g. because of a trailing comma after the last item in an array). The zenodraft/metadata-schema-zenodo repository contains a JSONschema file with the full specification, e.g. all possible license values etc.
The template filler leaves us with a file with
(hopefully correctly) filled-in template fields
titleversionrelated_identifiers
default values that probably can stay as they are
licensedescription(as of September 2023, we are using a default description)grantsupload_typecommunitiesaccess_right
default values that might need to be amended:
contributors, that is, engravers and annotators ("type": "DataCollector",), and curators ("type": "DataCurators",); each person MUST come with an ORCID and CAN have an affiliationkeywordscreatorspublication_date
Using the Zenodo form
From the Zenodo overview of our GitHub repositories shown in the screenshot above, we click on the DOI (the grey link, not the blue badge), which takes us to the record. At first it might look very incomplete:
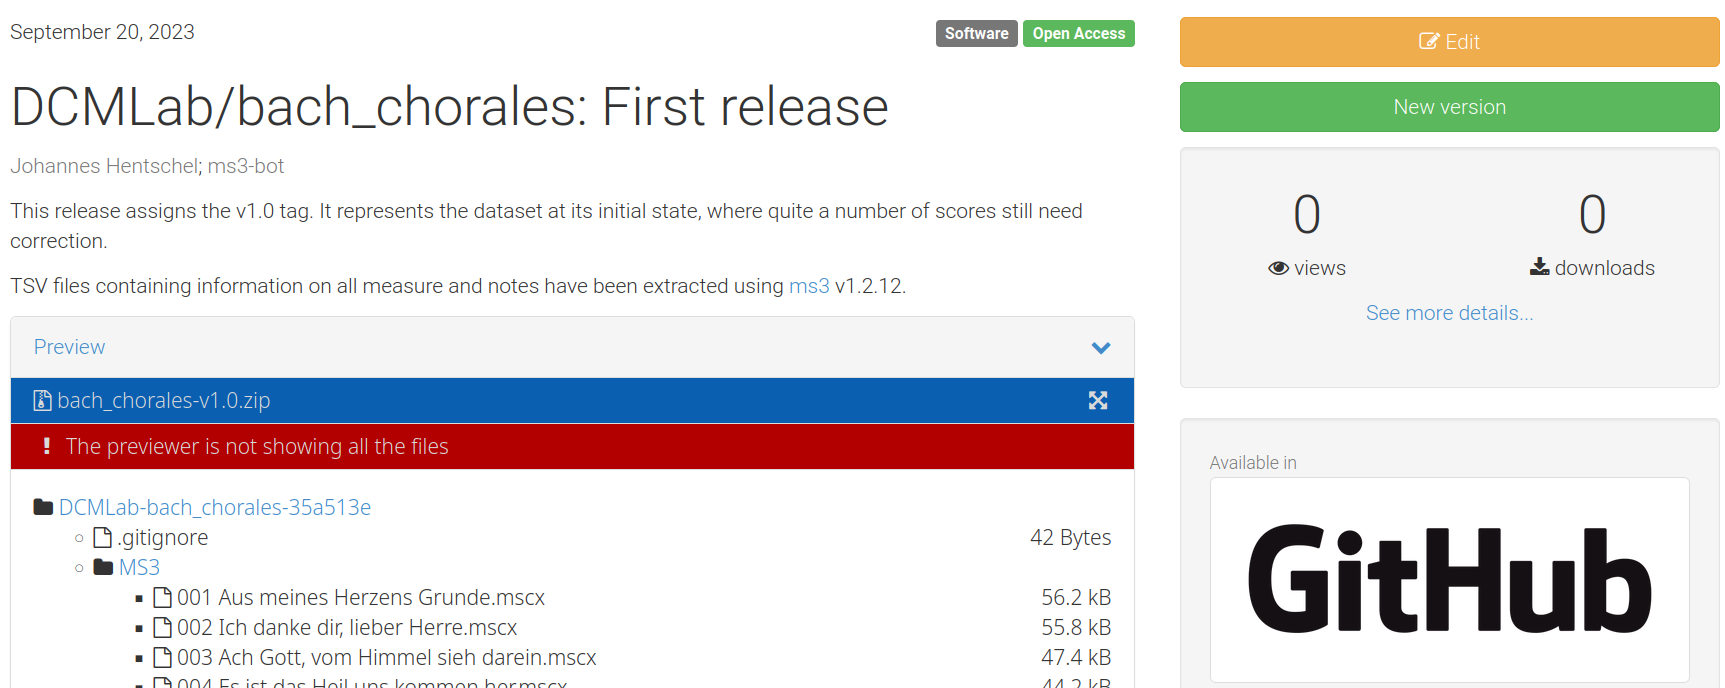
Zenodo record with very little metadata. It shows the record to be “Software” (instead of a “Dataset”), shows a generic title and body generated from the GitHub release, and has an incomplete author list.
Clicking on “Edit” we are taken to a form where we can fill in the missing information. The form is divided into multiple sections which we ideally we click through and fill according to the default metadata listed in the previous section. It is a good idea to click “Save” often; and when everything is edited, to click on “Publish”.
Then we can go back to the overview of GitHub repos (shown above), click on the release and on “Metadata”, from where
we can simply copy the generated JSON into a fresh .zenodo.json file in the corpus repository; but with one
important exception: The related_identifiers array contains an entry that causes the Zenodo API to reject a
release containing it, so it is important to remove it. It is the entry that has the "relation": "isVersionOf"
and might look like this:
{
    "scheme": "doi",
    "identifier": "10.5281/zenodo.8364205",
    "relation": "isVersionOf"
}
Warning
Bear in mind the above-said: When you remove an entry from an array, it is important to also remove the trailing comma. Ideally your text editor will do it for you or at least warn you about it.
With the syntactically correct .zenodo.json file pushed to the corpus repo, the next release will show with the
complete set of metadata and is looking rather neat:
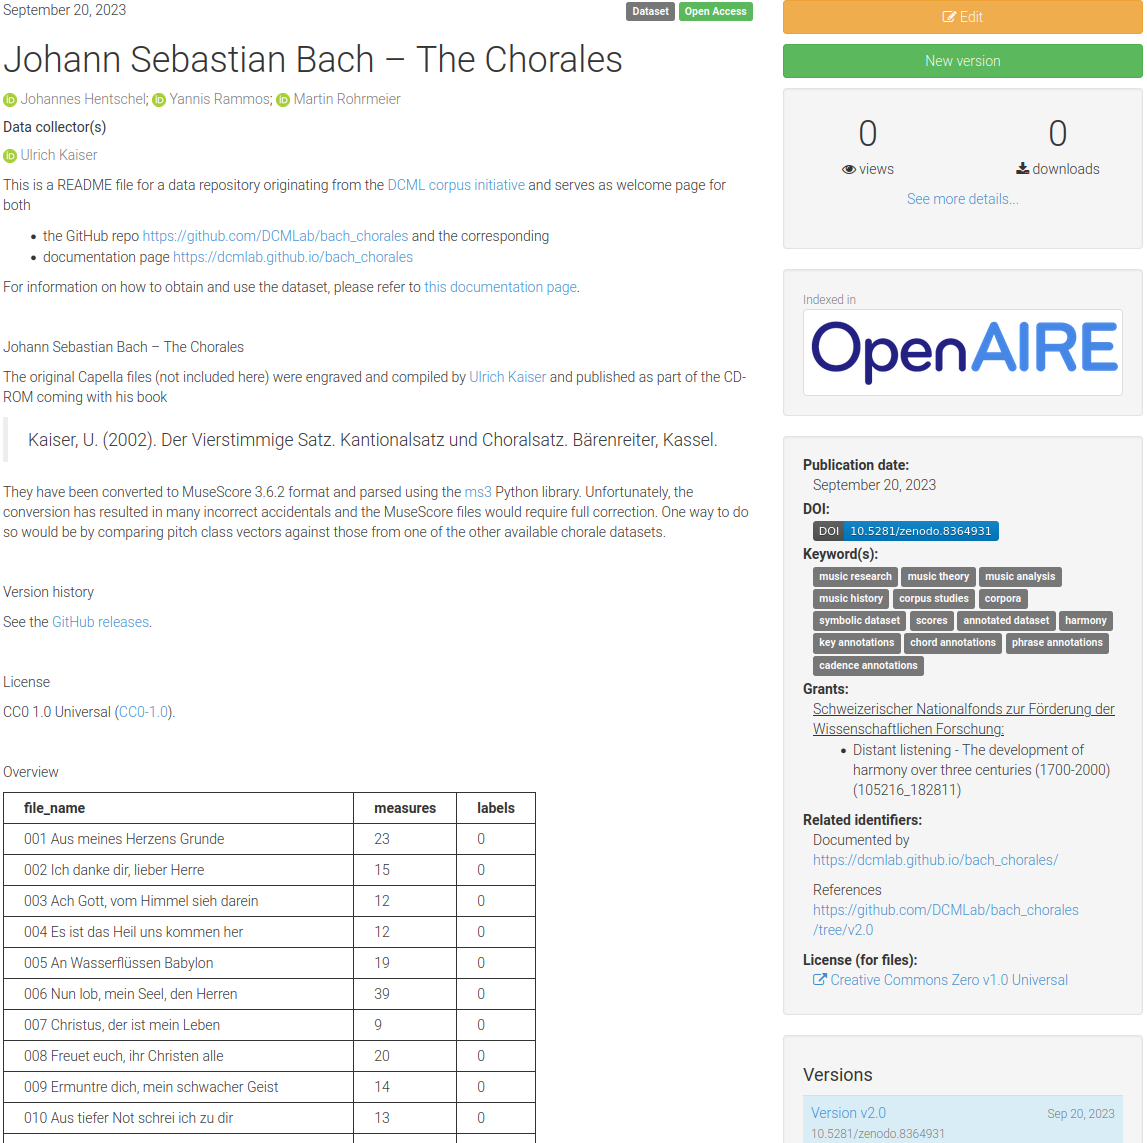
Zenodo record with complete metadata. It shows the record to be a “Dataset”, a HTML version of the repo’s README, creators and contributors with ORCID links, as well as keywords, funding information, and related identifiers.
Additionally, listing “epfl” in the communities field results in a request being sent to EPFL’s research data
team who will scrutinize the record according to the
EPFL community guidelines and send us an email with the outcome.