Getting started
Welcome to the DCML harmony annotation tutorial!
Introduction
The goal of this tutorial is to provide a systematic and condensed way of conveying the annotation philosophy and principles (aka “the guidelines”) behind the annotation standard. What has been condensed are more than two years of discussions between the music theory experts involved in the standard’s creation and application, i.e. between annotators, reviewers, and users. Therefore, this tutorial is not about telling anybody “how harmonic analysis really works” or “how everyone should be using Roman numerals”. Instead, it introduces a set of guidelines for analysts who want to use the DCML harmony annotation standard to encode a set of musical features in a consistent and machine-readable manner so that others can re-use and rely on the encoded information.
Summary
Although DCML harmony labels look like “normal” Roman numerals, they are more than that. Whereas the Roman numeral nomenclature (syntax) can convey a huge number of analytical meanings (semantics), the DCML standard aims at fixing syntax and semantics in a way that enables consistent communication of rich analytical information.
TL;DR
The DCML standard enables the production and communication of consistent music theoretical research data.
In case you want to contribute annotations to the DCML corpus, we would like to ask you to go through this tutorial word by word and to do the assignments. They come in the form of blue boxes that you can toggle to see the proposed solution. Since there is always room for improvement, in case things are unclear we invite you to leave us your feedback and suggestions on our issue tracker.
Preparing this tutorial
Get the files
The DCML stores all its research data in Github repositories and the history of every single file is tracked using the software Git. Therefore, everyone involved with creating and reviewing annotations needs to be or get familiar with Git version control. There are plenty of resources on the web and we have also compiled a small Quick Guide .
This tutorial is based on a couple of MuseScore files for you to open and annotate. If you know Git or just want to try cloning your first Git repository, clone https://github.com/DCMLab/annotation_tutorial
If you can’t be fussed right know, simply download this ZIP archive and unpack it to your disk.
Get the latest version of MuseScore 3
Please make sure to be using version 3.6.2 from the official GitHub page.
Downloading MuseScore
Head to the link above and download the installer for your operation system. If you’re using Linux but the latest version is not available in your package manager, you can download and execute the AppImage.
Already have it installed?
In case your local installation does not prompt you about the latest updates,
you may check your current version through Help -> About.... If your version
does not match the latest stable version on the download page, please upgrade.
Note to Linux users
On Linux you can find out your version using the command
mscore -v.
Placing the annotation cursor
To start writing your first labels, open up a score, e.g. corelli_op01n01a.mscx,
click on the note to which you want to attach the label, and go to
Add -> Text -> Roman Numeral Analysis. A cursor appears under the note so you
can start writing Roman numerals, skipping from note to note using [SPACE].
Keyboard shortcuts
Shortcuts are mainly there to impress your friends but they also save you a lot of time. Therefore this tutorial introduces the most important ones where, depending on your keyboard, the keys have different names. We use the following placeholders:
[S]for Shift[C]for Ctrl (Windows/Linux) or Cmd (Mac)[A]for Alt (Windows/Linux) or Option (Mac)[TAB]for tabulator (the key with two arrows, above [CAPS LOCK])
MuseScore has a lot of keyboard shortcuts pre-defined and where they are lacking
or you find them unpractical, it lets you define your own. To do that, simply go to
Edit -> Preferences, switch to the Shortcuts tab and look for the
functionality in question. In our case, we
start typing “rom” in the search bar below
double click on “Add Roman Numeral analysis”
press the desired shortcut, e.g.
[C]+R; upon mistake, click “Clear”click on “Add” to leave “Old shortcuts” intact or “Replace” to replace them.
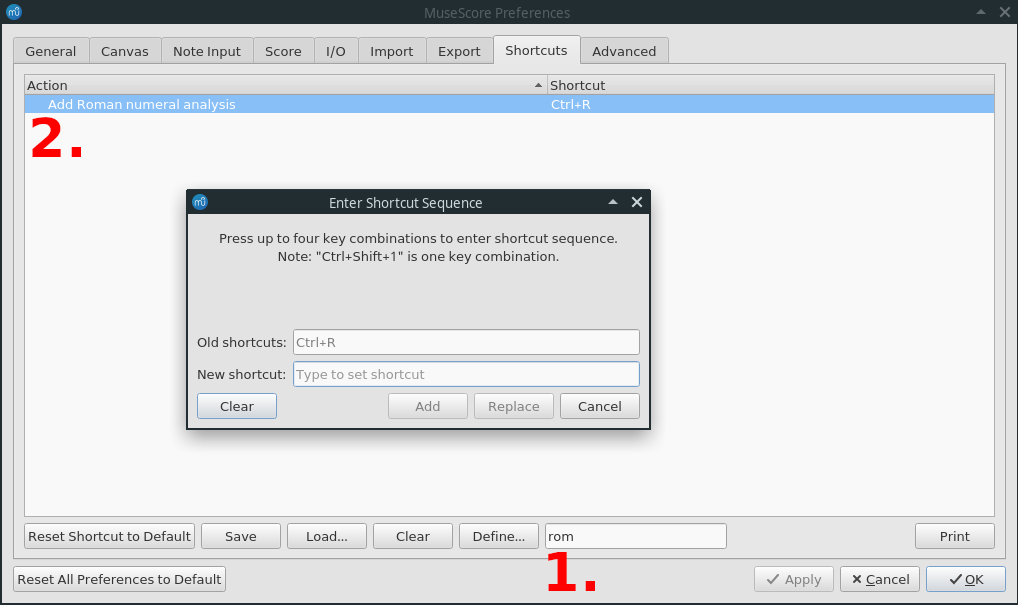
Defining your own shortcut in MuseScore
Moving the annotation cursor
Having clicked on the first note in the lowest staff and pressed your shortcut, you can enter the Roman numeral and
go to the next note pressing
[SPACE];go to the next measure pressing
[TAB];move the cursor by a particular note value pressing
[C]+3for a sixteenth note;[C]+4for an eighth note;etc. (same numbers as when entering notes)
go to previous note (
[S]+[SPACE]) or previous measure[S]+[TAB]
Background knowledge and tricks
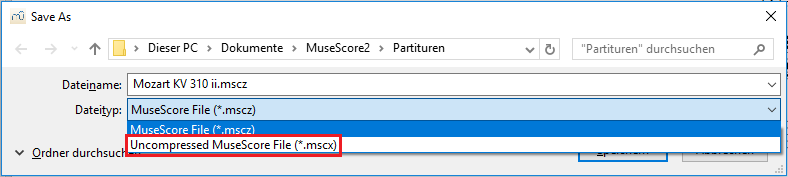
MSCZ vs. MSCX
There are two types of MuseScore files. The software saves files
automatically in the compressed format .mscz, creating smaller file
sizes. However, we work with the uncompressed .mscx format because
it represents text files. Please make sure to save the annotated score in
this format by using Files -> Save As... and selecting the
“Uncompressed MuseScore File (*.mscx)” format.
Editing annotations
If you want to change a chord symbol, double click (or tap) on it to get
into chord edit mode. To delete one, get out of edit mode (Esc), click on the
symbol once to select it, and press Delete.
If you want to change the beat/position of a symbol, it is important not
to drag it horizontally because it stays linked to the moment where you
entered it. Therefore, you need to delete it and enter it anew on the
right position. Of course, the quickest way to do this is to select the label,
cut it with Ctrl + X, select a note in the correct position and
insert it with Ctrl + V.
Copying several annotations
If you find an exact repetition, make sure, it actually is an exact
repetition first before copying symbols. Then, go to the symbols you
want to copy. Draw a selection frame around the symbols or select the
respective measures in the navigator (F12): Right-click on one of the
selected symbols and go Select -> All similar elements in range selection.
If required, hold [C] and click on individual labels to add/remove
them to/from the selection. Copy with Ctrl + C, then select the first beat where you
want to paste the symbols and press Ctrl + V. It is important that
no other symbols exist in the range where you paste to avoid duplicates
or twofold annotations for the same position.
Visibility
Although not important for the computerised analysis of your annotations, it is preferable to arrange them in a human-readable way.
If two expressions overlap horizontally, just drag the first one up or down with your mouse (or touch device). Make sure to leave any edit mode first, using
Esc.If expressions overlap with notes, you can drag them manually as well. But if this is often the case, you might want to
change the distance between the chord symbols and the respective system for the entire document by changing the value under
Style -> General... -> Chord Symbols, Fretboard Diagrams -> Default vertical position. A usable value might lie around6.00sp. If the distance is good but chord symbols overlap with the above system, you might want tochange the distance between all systems by raising the value of
Format -> Style -> Chord Symbols.
Start annotation tutorial
Do you know how to place your annotation and cursor and how to move it around?
Once you have finished a section, you can go to the next section by clicking
on it in the navigation menu, in this case called The first label.