Work package management with OpenProject
To facilitate assigning work packages, reviews, and accounting, we are using a self-hosted OpenProject instance.
User Interface
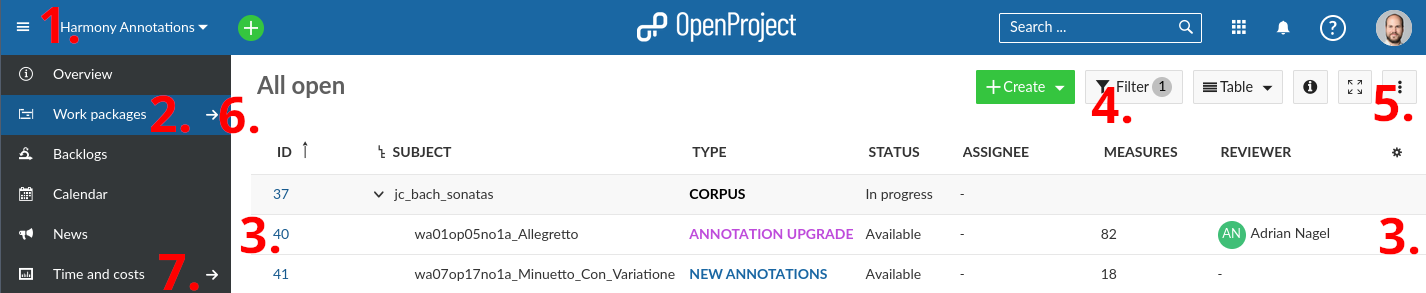
Make sure to access the project
Harmony Annotations(you need to be added by an admin).Go to
Work packages.To see or alter information of a work package, click on its ID or use the blue menu that appears when hovering over the right end of the row.
Use the filters to see only particular work packages.
Use the menu
... -> Save as...to save a filtered view.Find saved views in the
Work packagessub-menu.Time and costsis where you can create cost reports.
Work Packages (WPs)
Each package corresponds to one piece that needs to be annotated (package type New annotations)
or upgraded (package type Annotation upgrade). Independent on which task you are performing, you simply need to
remember to change the status before and after working on a piece. This way it is possible to self-assign without
duplicating any work.
Life cycle
Each package traverses the following statuses, in this order:
Not available: to be disregarded for nowAvailable: to be (self-)assigned; theAssigneefield should be empty and, once filled, the status needs to be changed toIn progress: currently being undertaken by the person marked in theAssigneefieldNeeds review: the annotator/upgrader has finished and the person (self-)assigned in theReviewerfield should begin their reviewUnder review: review & subsequent discussions currently in progress (refer to the PR).Done:Reviewerhas approved the PR which consequently has been merged by theAssignee.Finish dateis set to the current date.
The responsibility lies with the Assignee to make this life cycle as long as necessary and as short as possible.
This might involve contacting fellow annotators in case the workflow has gotten stuck.
Workflow
- Decide what you want to work on.
As a general principle, please give preference to finalizing tasks before addressing new work packages (WPs). Both
AssigneeandReviewermay only invoice work packages that have reached the statusDone, meaning that the associated Pull Request (PR) has been reviewed and merged.First, make sure you have addressed all comments and new commits in the PRs in which you are involved (always make sure you are subscribed on GitHub in order to receive notifications).
When all PRs have been addressed, please use OpenProject’s filter functionality to see if
you are the
Assigneefor packages with statusAvailableyou are the
Reviewerfor packages with statusNeeds review
Usually, if this is the case, it is because of an agreement you have made with DCML. The default is that people self-assign (in which case the status should be
In progressorUnder review).If your desk is clean and you want to take on a new task, use the
Work packages -> To Doview. Please give preference to the packages with statusNeeds reviewin order to finalize them quickly, to make them invoiceable, and to get them out of our way.
- Self-assign.
If you are addressing a package with status
Needs review, theReviewerfield needs to be empty so you can enter your name and set the status toUnder review. Otherwise, the review has been assigned to someone else. For details, see below.If you are addressing a package with status
Available, theAssigneefield needs to be empty so you can enter your name and set the status toIn progressand the Start date to “Today”. Otherwise, the task has been assigned to someone else. For details, see below.
- Perform the task according to the usual GitHub workflow.
If you are the WP’s
Assigneeyou end your task by creating a Pull Request that you link to the WP by including the WP’s URL in the PR’s description (see screencast below).If you are the WP’s
Revieweryour task ideally ends with you having committed to the PR to the point where you approve it (see screencast below).
- Change the WP’s status and log the costs.
If you are the WP’s
Assignee, you change the status toNeeds review. If it takes too long (say two weeks) for anyone to take on the review, please ping your fellow annotators.If you are the WP’s
Reviewer, there is nothing for you to change in the work package. If, after your approval, theAssigneetakes unreasonably long to merge the PR and set the status toDone(thus allowing you to invoice your work) you may ping them politely.
- Finalize the WP.
Once the
Reviewerhas approved the PR and theAssigneehas reviewed and agreed with their changes, it is theAssigneeyou merges the PR and enables the package for invoicing by performing two equally important steps:The WP’s status is changed to
Doneso it can show up in the cost reports.The WP’s
Finish dateneeds to be set to “Today” so as to allow for filtering out previously invoiced cost items.
Taking on an assignment
Once more, the workflow described above in a nutshell:
In the work package sub-menu, use the
Assigned to medefault view to check if any of the packages assigned to you require your action. Finish any open tasks before taking on new ones.Use the view
To Doto display work packages that have statusAvailableorNeeds review.Assign yourself, change the status.
If you are the
Assignee, also change theStart date.
Perform the task. If you are the
Assignee:include the URL of the work package in the description of your Pull Request, and
change the status to
Needs review.
Log the costs.
Follow the progress of the Pull Request and help it to be merged soon.
Once the PR has been reviewed and a consensual solution found, the
Assigneemerges the PR, sets the status toDoneand theFinish dateto the current date. Only at this point can assignee and reviewer invoice the task.
Taking on New annotations or an Annotation upgrade
Before the task
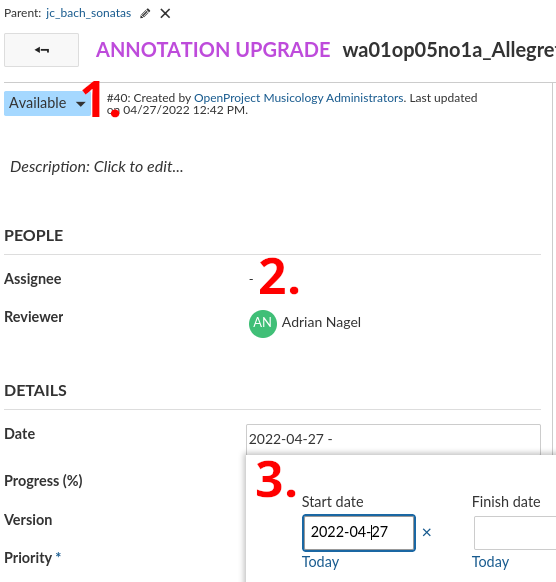
Open the details of the corresponding work package.
Change the status from
AvailabletoIn progress.Add your name to the field “Assignee” (which should be empty).
Set the “Start date” to
Today.
After the task
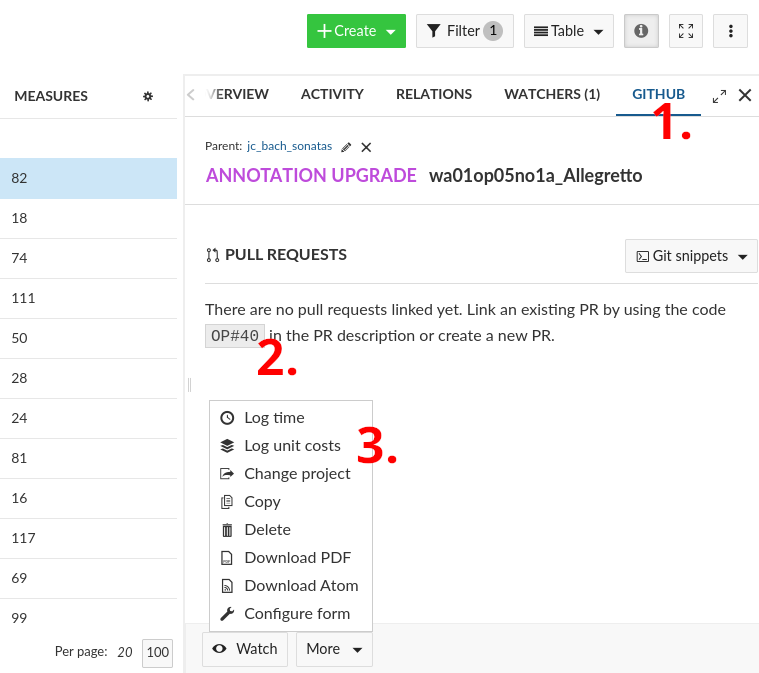
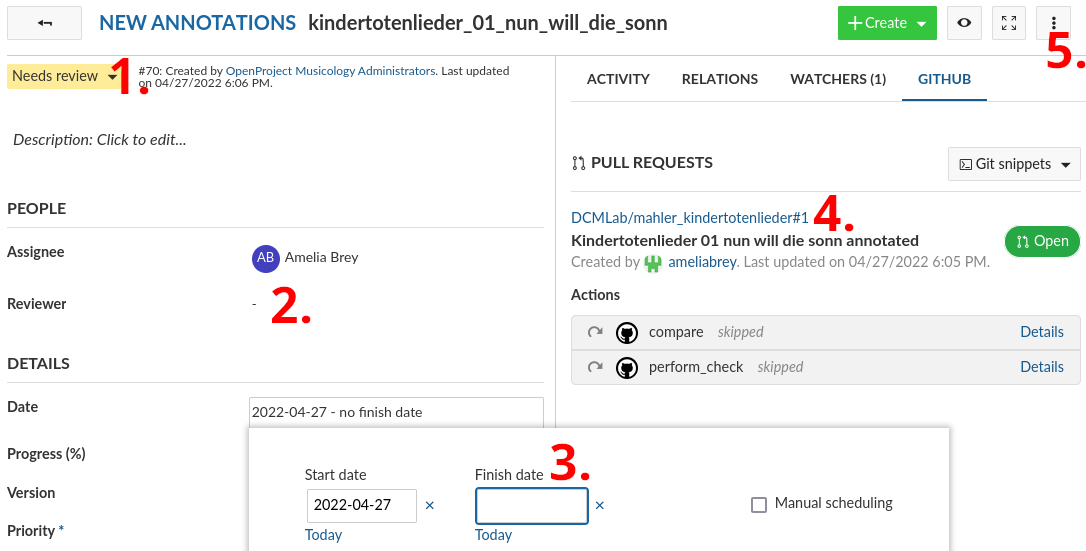
You want the Pull Request to show up in the “GitHub” pane of the work packages so that the reviewer can easily find it.
For that you simply open the work package and copy its URL into the description of your PR (see screencast). Compared to using the short string that OP suggests to you (e.g.
OP#81for the WP with ID 81) the URL has the advantage that when you merge the PR later, you get to the WP more quickly to set the status toDone.Then take note of the number of measures and log the costs.
Once your PR has been approved and you agree with the reviewer’s changes, you are responsible for merging the PR, changing the WP’s status to
Doneand, importantly, setting theFinish dateto “Today”.
Linking a Pull Request to a Work Package. It doesn’t matter that in this case the PR is already merged and the
package marked as Done.
Taking on a review
Open the details of the corresponding work package.
Change the status from
Needs reviewtoUnder review.If you hadn’t been assigned already, add your name to the field “Reviewer”.
Find the Pull Request in the GitHub pane.
Once the review is finished, approve the PR (unless you need to request changes) and log the costs.
From here on, be attentive to any comments and discussion points raised by the
Assigneeand make sure to find consensus as efficiently as possible. It is a matter of teamwork to get the PR to a mergeable state and thus the work package to statusDone, invoiceable for both.
How to approve a PR (the screencast skips the actual review process which usually includes commits, comments, and metadata update).
Logging unit costs
OpenProject computes the amount to be invoiced for each work package based on the number of measures.
Open the Work Package in question and find the number in the field “Measures”. In case the status is
Done, please verify that theFinish datehas been set upon merging the PR.Open the context menu (
...orMore) and selectLog unit costs.In the mask that opens,
under
Cost typeselect the kind of service you provided (and thus the associated tariff).enter the number of measures in the field
Unitsfor convenience (see the section on writing invoices), write the repository name in the
Commentfield.
Click “Save”.
How to log unit costs. Here, the WPs in questions did not have a Finish date yet. For convenience, the respective
column is added to the view but the date can also be entered in the WP’s Overview. Here, the annotator is not
including the repository name (scarlatti_sonatas) in the Comment field although it would be a good idea.
Writing invoices
As you know already, you can invoice your finalized tasks at any given moment. Tasks are finalized when a Work Package’s
Assignee and Reviewer reach expert consensus on a set of annotations. Therefore, you can invoice tasks only
after the respective WP has reached the status Done.
Starting from May 2022, all invoices should be based exclusively on cost reports generated by OpenProject.
Therefore it is important that you don’t forget to log your costs after performing a task
and that Assignee set the WP’s Finish date to “Today” when setting the status to Done.
Creating a cost report
How to generate a cost report.
Head to the “Time and Costs” menu and select the “Ready for invoicing” view.
Add the filter
Finish date >= [day after your last invoice]. If this is your first invoice, you can skip this step.Click “Apply” and verify that the displayed unit costs indeed cover the finalized WPs you have undertaken. If a WP is not shown, at least one of these three things must be true:
You have not logged your costs.
The WP has not reached the status
Doneyet.The WP is missing its
Finished date(or the date does not match your filter).
Click on “Export XLS” to export the Excel file to be attached to your invoice.
Use the different sheets contained in the Excel file to sum up measures and costs to come up with the items for the invoice (see below).
Writing an invoice
For the actual invoice you can use our template or your own as long as it contains
your address
the current date
an arbitrary invoice number
one item per repository per type of service (e.g. one for “Creating new annotations” and one for “Reviewing new annotations”)
for each item, the accumulated number of bars and aggregated costs (e.g. “Creating new annotations | scarlatti_sonatas (321 bars) | 160.50 CHF”)
the total sum
your bank details
your signature
Once you have the invoice PDF ready, please give both files the same name starting with a backwards (YYMMDD) date,
for example: 220519_Johannes_Hentschel.pdf for the invoice and 220519_Johannes_Hentschel.xls for the
cost report.
To compute the individual per-repository items easily, simply open the exported XLS (Excel) file and pick one of the two methods described in the following.
Note
This following screencasts use LibreOffice to open the cost report. The process of sorting and creating sums or pivot tables should work exactly the same way in other spreadsheets such as Excel or Numbers.
From cost report to invoice items - Variant 1
The first variant is easier but more work.
The cost report contains one sheet per cost type, so you need to go through the four sheets and
if all packages are from one corpus, create one item per cost type;
if the packages are from several corpora, use
=SUM()to sum up sub-groups of measures (“units”) and costs, and create one item per repository
Screencast showing the first variant of how to get from the various sub-sheets contained in the automatically generated cost report to items for the invoice grouped per task per repository. Note that the screencast stops after the tasks “Creating new annotations” and “Upgrading existing annotations”, which is why the invoice items do not yet sum up at the end. In order to more easily group the WPs in the “Upgrading existing annotations” sheet that belong to different repositories, the sheet needs to be sorted by their IDs.
From cost report to invoice items - Variant 2
The second variant is slightly more involved but less work.
Here you only work on the first sheet (“Cash value”). In order to create a pivot table you need to add the
repository name for every work package (unless you had already included the names in the Comment field while
logging the costs), which might be easier if they are sorted. Then you go to
Insert -> Pivot table and distribute the columns as is most convenient for you. A good suggestion is
Columns =
Comment(the column where you put the repository names)Rows =
Cost typeData =
UnitsandCosts
Screencast showing the second variant of how to get from the various sub-sheets contained in the automatically generated cost report to items for the invoice grouped per task per repository using a pivot table.
The first invoice
For your first invoice the difference is twofold:
Since there has been no previous invoice, the work packages do not need a
Finish date. You simply generate a cost report based on all costs you have logged for packages with statusDone.In order for your first invoice to be treated, the university administration needs you to send along the following documents:
a copy of an ID (ID, passport, or driver’s license)
a document proving that the bank details indicated on the invoice are associated to you (e.g. copy of your banking card or a document showing your name and bank details, provided by your bank)
Make sure that the work packages you want to invoice are present in OpenProject, that your name appears in the relevant columns, and that you have logged the costs. An easy way to do this is by using OP’s filter functionality and by adding the column “Unit costs” to your view. Complete the information where missing. Then you may proceed with Creating a cost report.