A semi-automated workflow paradigm for the distributed creation and curation of expert annotations
- Introduction
- Documentation
- Known limitations
- Bugs and issues
Introduction
This page introduces a concrete implementation of the annotation workflow paradigm proposed by Johannes Hentschel, Fabian Moss, Markus Neuwirth, and Martin Rohrmeier at the ISMIR conference 2021. It makes use of GitHub Actions and can be easily adopted through the corresponding template repository. It is an adapted version of the implementation that is at the heart of the DCML Corpus Initiative and, without further configuration, works out of the box for public repositories only.
General use Case
The implementation is designed for a distributed setting where one or several annotators create text-based annotations in Git repositories hosted on github.com, where their history is kept including all discussions occurring during their review. The following schema shows one cycle of the workflow, at the end of which a reviewed annotation file is merged into the main branch, reflecting a consensus between the annotator and the reviewer, as laid out in our conference paper:
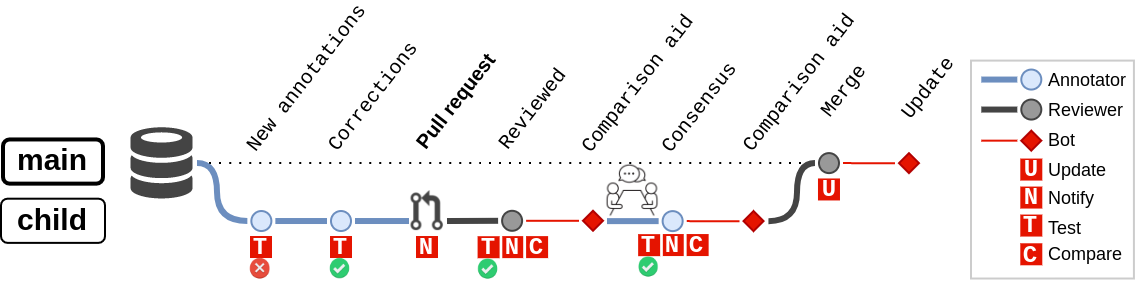
The workflow currently consists of four different automatic actions, represented as red squares in the schema, that are triggered by particular events:
Testis triggered upon every push to a child branch and checks the annotations in all modified files for syntactical correctness. The schema exemplifies how this action detects at least one syntax error in the commitNew annotations, causing the annotator to pushCorrectionswhich pass the renewed test.Compareis triggered upon every push to a child branch after a pull request has been created. For every new version pushed during the deliberation between annotator and reviewer(s), this action, through a bot account, pushes auxiliary files that allow to keep an easy overview of the suggested changes. This can be particularly helpful in use cases where the annotations need to be seen in relation to the original data that they describe in order to discuss them.-
Updateis triggered upon merge of the reviewed annotations into themainbranch and, again, uses a bot account to- include information about the completed annotations in overviews, for instance names of annotators and reviewers, amount of annotations, version of the annotation standard, applied tools, etc.
- create summary statistics and plots for the new annotations
- convert the new annotations to different formats, perform transformations, etc.
- The fourth action,
Notify, stands for notifications that GitHub dispatches to the contributors according to their preference settings, to inform them about particular events to which they might have to react, such as a new version with changes to be discussed.
Specific use case
The implementation that users can use out of the box is tailored to the specific setting where annotators make use of the free and open-source notation software MuseScore 3 to enter annotations into scores. In principle, it can be used for whatever annotations you may want to enter (see section annotate files), but by default it is specifically configured to test all entered labels for compliance with the DCML harmony annotation standard which follows a particular syntax to encode harmony, phrase, and cadence annotations.
In order to perform automated tasks on annotated MSCX (uncompressed MuseScore format) files, this workflow implementation uses commands provided by the parsing library ms3. The mapping of the three actions mentioned above to commands of this library is:
-
Update => ms3 extractto extract and store information from the annotated MSCX files in the form of tab-separated values (TSV) files, namely by default:- annotations
- notes
- measures
- metadata
Test => ms3 checkto detect syntax errors in the annotated MSCX filesCompare => ms3 compareto store, after a review of annotations, a copy of each reviewed MSCX file in which the reviewer’s changes are colour-highlighted.
If you are using other annotation standards, you may want to
- substitute code for
ms3 checkaccordingly, to test your annotations’ validity; - prevent
ms3 extractfrom trying to split the annotation labels into the various features encoded through the DCML standard (see at the end of the section ms3 extract below).
How to use the workflow implementation
This is a quick reference how the implementation can be used out of the box. A more detailed explanation for annotators and reviewers that also includes specific Git commands is part of the DCML annotation standard’s documentation. The documentation below aims at users who would like to adapt the GitHub workflow files to their particular use case.
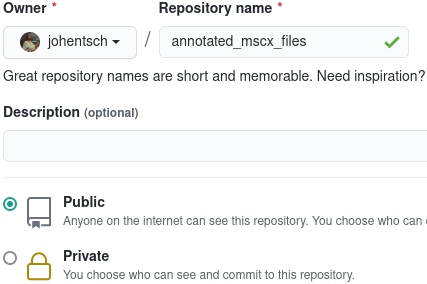
Create a GitHub repository
- Head to the template repository
and click on “Use this template”.

- Create the new repository (if you want it “Private”, you need to reconfigure
the bot, see below).
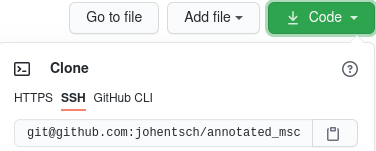
- In the new repo, click on “Code” to copy the URL for the
git clonecommand and clone the repo to your machine (git clone git@github.com:johentsch/annotated_mscx_files.gitin the example here).
Add uncompressed MuseScore files
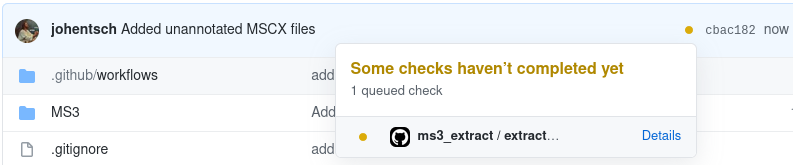
- Create a subfolder (here called
MS3), add the MSCX (uncompressed MuseScore format) files to it, and push everything to GitHub. During the following minute, the yellow circle indicates that thems3_extractAction is running.
- Refresh the page until the yellow circle becomes a green check. You will
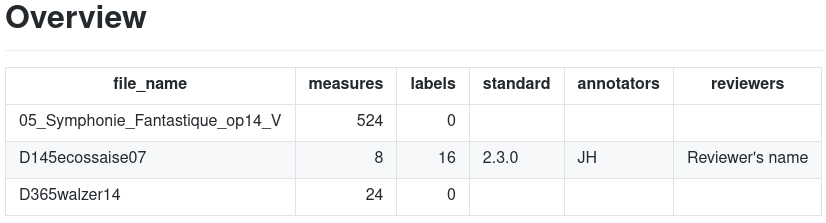
see that the
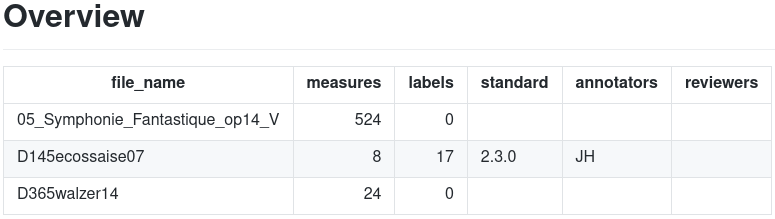
github-actionsbot pushed a commit creating the foldersmeasuresandnotesas well as the filesREADME.mdandmetadata.tsv.
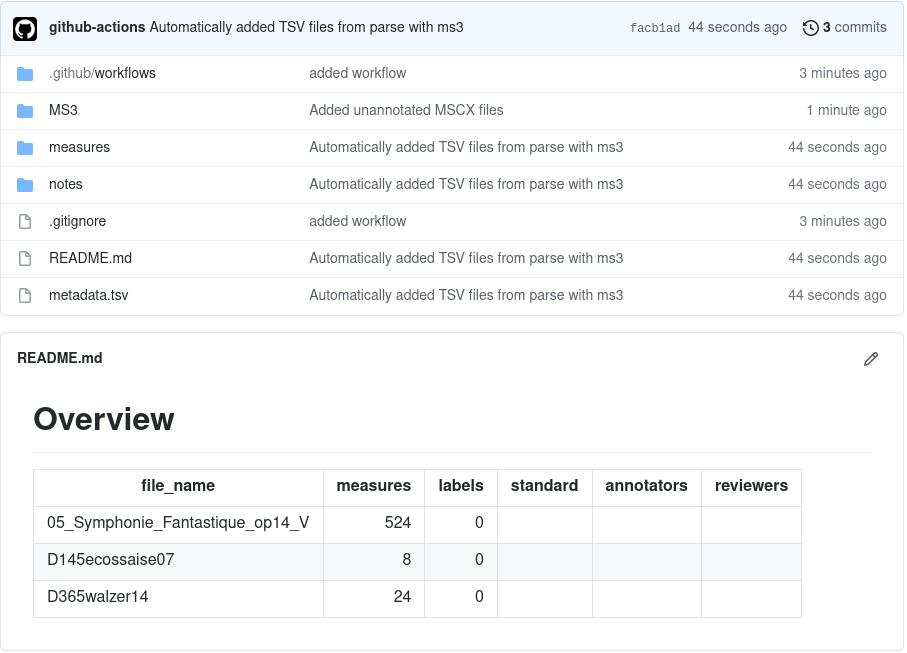
These files are automatically updated every time an MSCX file is modified on the main branch. Exactly what information is extracted and stored under which directory can be configured to your needs (see the section ms3 extract below).
You can add custom text to the README.md as long as you do it above the ‘Overview’ heading. Everything below this heading is automatically overwritten.
Annotate files
- Create a new branch and use MuseScore 3 to add annotation labels to one of the
harmony layers (
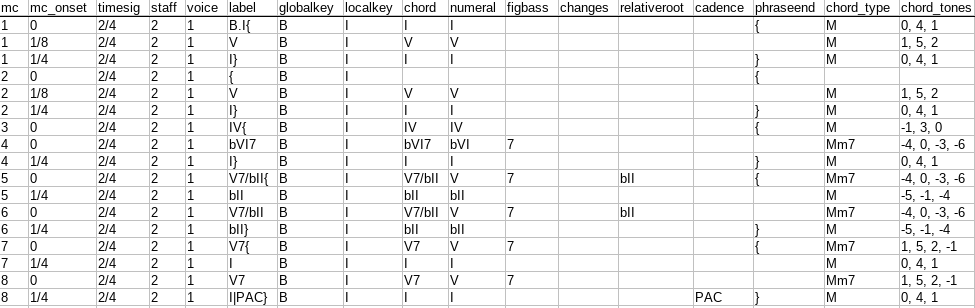
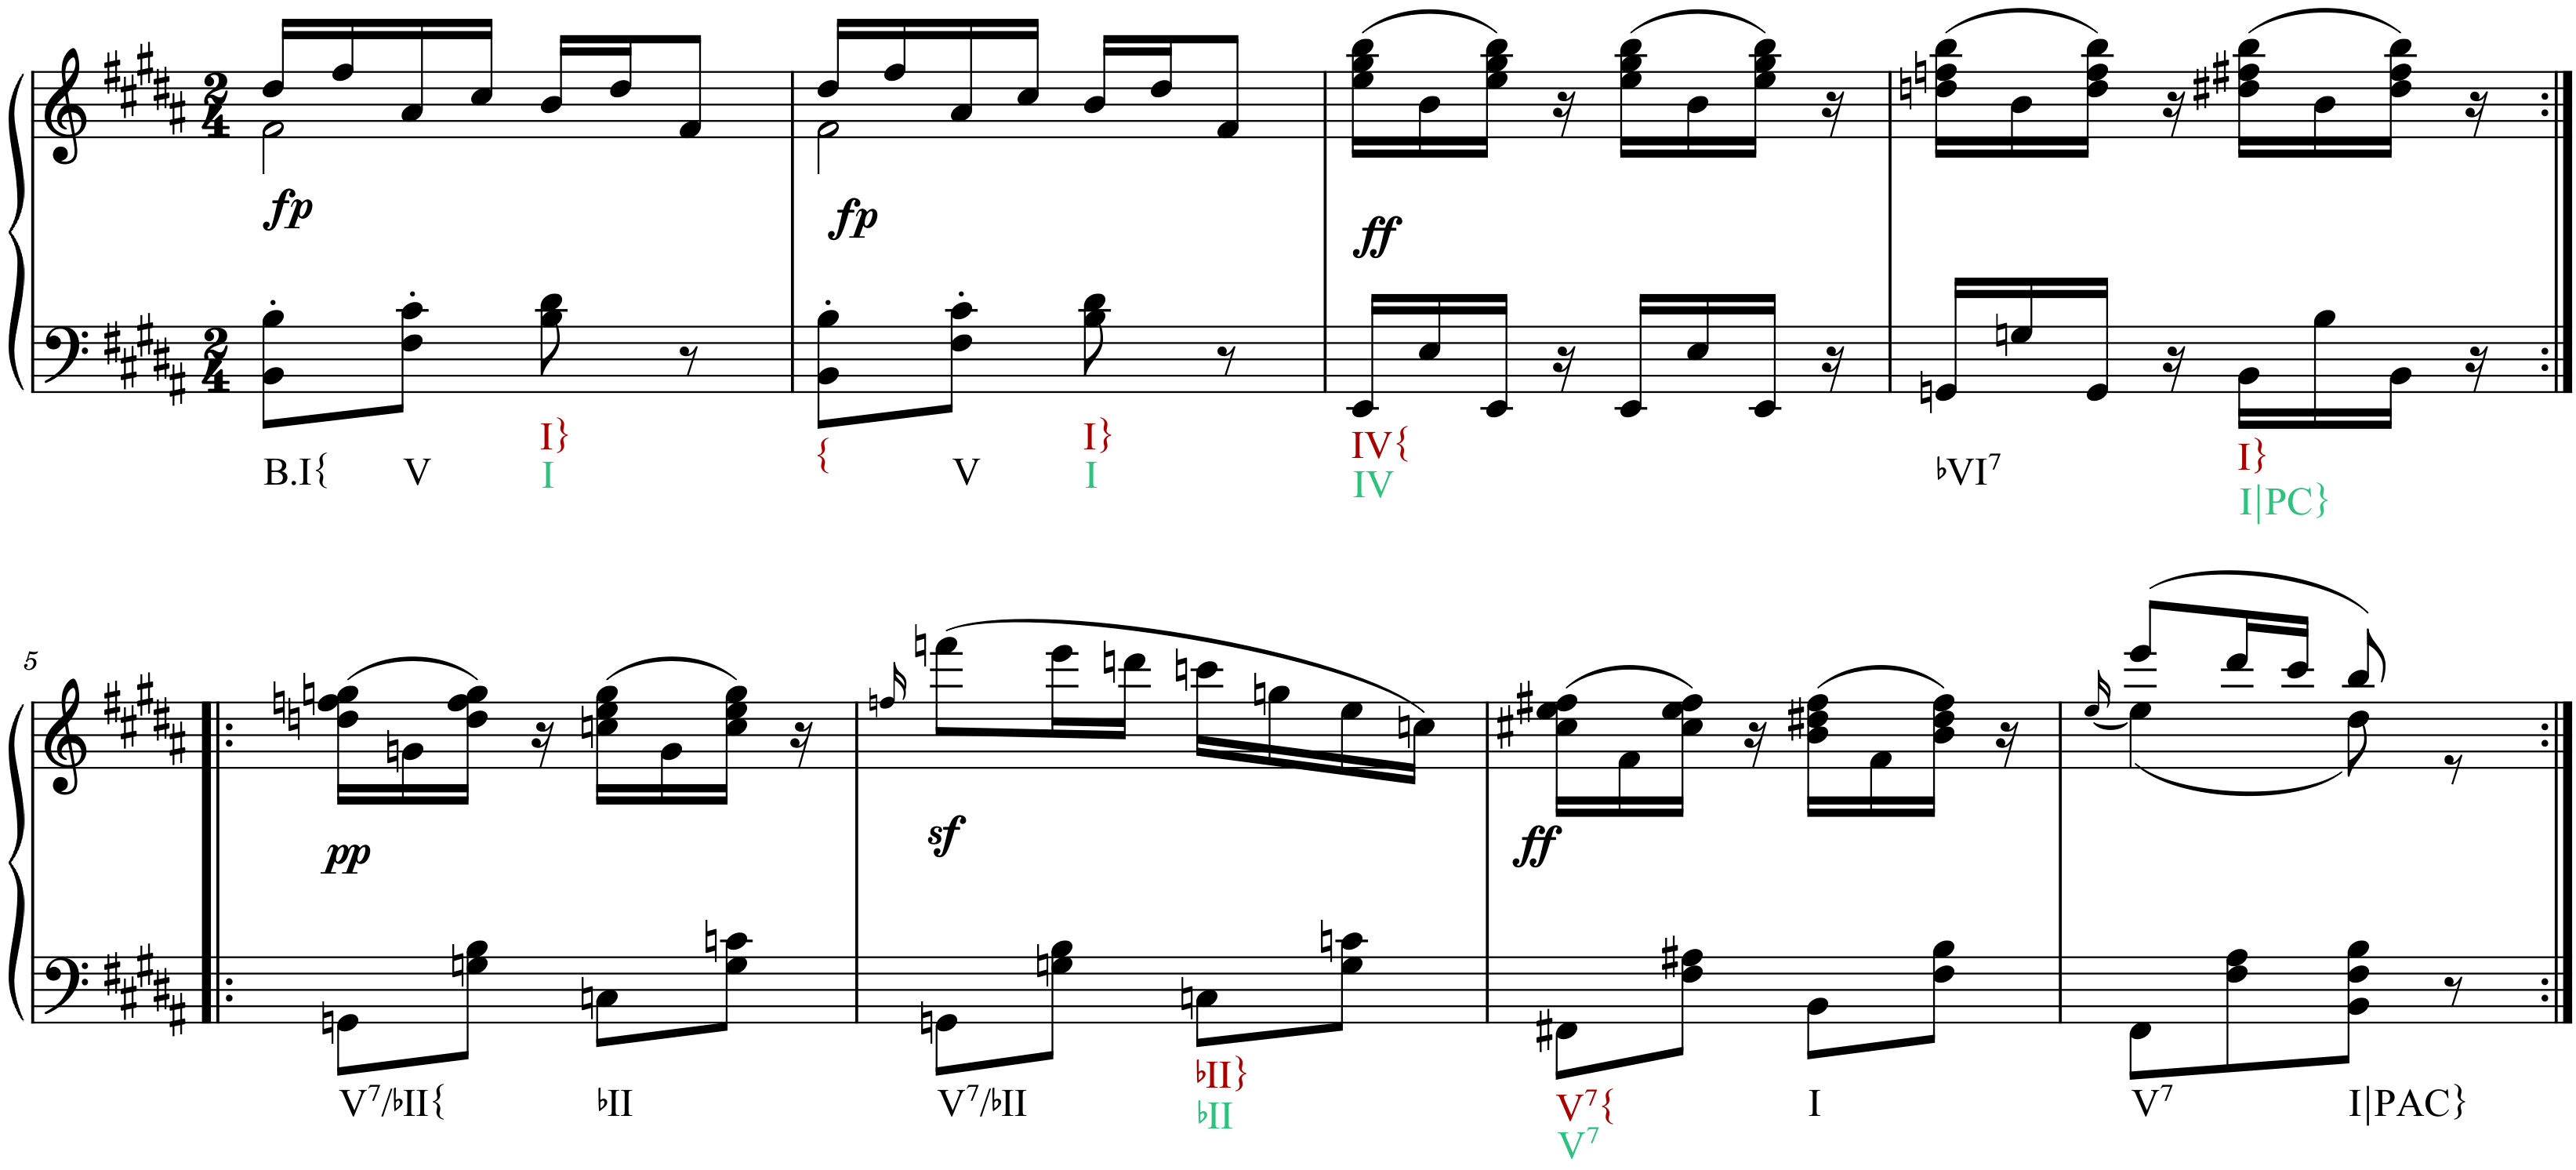
Add -> Text -> {Chord Symbol|Roman Numeral Analysis|Nashville Number}). For example, take this annotated Ecossaise No. 7, D. 145 by Franz Schubert that uses the Roman Numeral Analysis layer and the DCML syntax:

- Commit the changes. Every time you push to a child branch, the labels in
all changed files will be checked for syntactical correctness according to
the DCML harmony annotation standard:
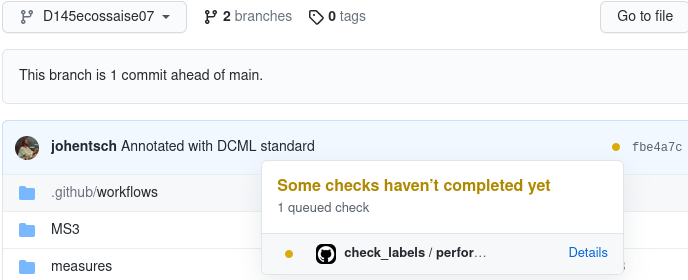
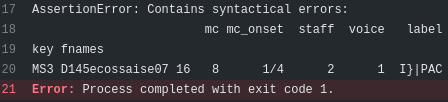
- If the yellow circle turns into a red cross, at least one syntax error was
found and by clicking on it you can have it displayed. In this example, the
output shows one wrong label in measure 8, onset 1/4 (beat 2), because
the
}indicating the phrase ending needs to be the last character:
- Once the error is fixed, the new annotations can be merged into the main
branch by opening a pull request:
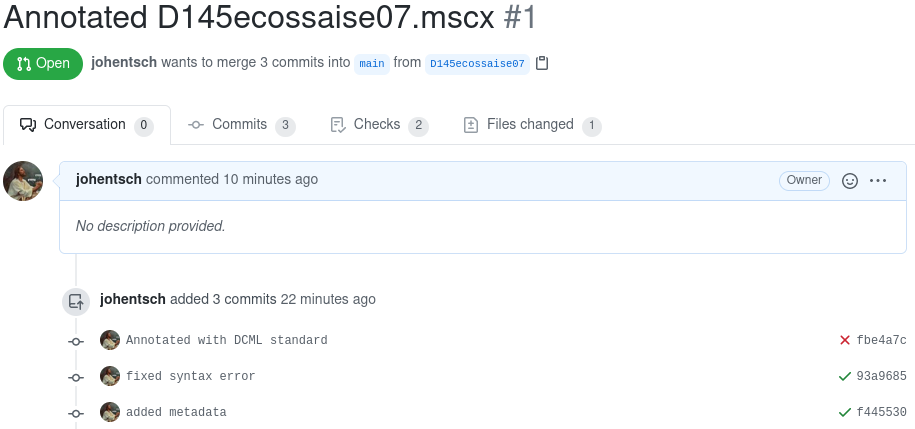
- After merging the pull request, the
ms3_extractaction is triggered again which will
- extract a tabular overview of the labels and store it as
harmonies/[file name].tsv:
- read out the metadata from the updated MuseScore file which had been modified
in MuseScore by the annotator like so (
File => Score Properties):
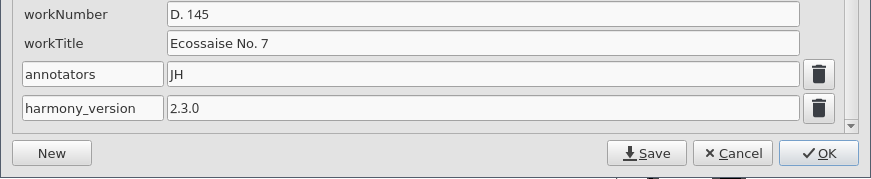
- and writes these metadata to
metadata.tsvand to the overview in the README file:
Our Annotation Tutorial has some more explanations on how to conveniently add Roman Numerals in MuseScore 3.
If you are using other annotation standards, you may want to
- substitute code for
ms3 checkaccordingly, to test your annotations’ validity; - prevent
ms3 extractfrom trying to split the annotation labels into the various features encoded through the DCML standard (see at the end of the section ms3 extract below).
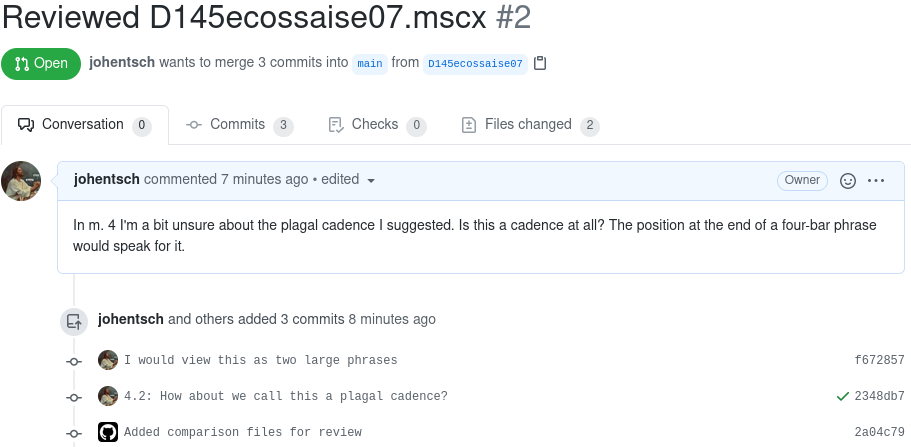
Review files
- The reviewer checks out a child branch and commits their changes to the annotated MuseScore file, which includes adding their initials to the file’s metadata so that they will appear in the README upon merge into main.
- Then, the reviewer creates a pull request to suggest the changes to
the annotator who is supposed to go through them to approve or contest them:
This time, because of the presence of theharmonies/[file name].tsvfile, thelabel_comparisonresults in thegithub-actionsbot pushing an auxiliary MSCX file highlighting the changes made by the reviewer:
- After merging the pull request, the README shows that one file is done and
two others are yet to do:
Documentation
In the following we cover what you need to know to adapt the implementation
to your own needs. As described in the conference paper, it is organized
around three different tasks, each defined in its own YAML file stored in
the (hidden) folder .github/workflows:
extract.yml(Update), triggered upon every push to themainbranch;check.yml(Test), triggered upon every push to a child branch (not onmain);compare.yml(Compare), triggered upon pull request and new commits added to it.
The following sections explain the structure of these files to give an idea how they can be adapted to other projects’ needs. Projects using annotated MuseScore files, too, might want to keep using the MuseScore parsing library ms3 and adapt the employed commands. For dealing with other annotation data, users will have to replace the library with other code.
Structure of the YAML files
On the top level, each configuration file has three directives:
name:   # arbitrary name of the action
on:     # definition when the action is triggered
jobs:   # definition of one or several jobs, each launching a new runner
Since every job sets up a new runner (virtual machine) needing set up and configuration, each of the three tasks consists of only one job.
Defining the triggers via on:
We are using the events push and pull-request. A full list of possible
events is available in the GitHub documentation.
extract.yml is triggered upon every push to the main branch:
on:
  push:
    branches:
      - main
check.yml is triggered upon every push to a child branch (not on main):
on:
  push:
    branches-ignore:
      - main
compare.yml is triggered upon pull request and new commits added to it:
on: pull_request
This directive can be easily adapted.
Defining the job via jobs:
The general structure of the three jobs is as follows (each sub-task corresponding to a subsection below):
- Clone the current repository to perform actions on it
- Install code on the runner for performing the action
- Detect which files were changed and perform the automated action on them
- (Have a bot push generated files to the repository, if applicable)
Each job is defined through a sequence of steps and requires a runs-on:
directive specifying the operating system of the runner to be set up. Our jobs
use the GNU/Linux runner ubuntu-latest. A full list is available in the
GitHub documentation.
For example, this is how the job named compare is defined:
jobs:
  compare:
    runs-on: ubuntu-latest
    steps:
      - name:   # arbitrary name of the first step
        run:    # commands run during this step
      - name:   # arbitrary name of the second step, etc.
A job definition affords an if statement preventing its execution if the
statement is false. For example, the job perform_check is only executed
if the triggering push event was not authored by the bot account:
jobs:
  perform_check:
    if: github.event.pusher.name != 'github-actions[bot]'
    runs-on: ubuntu-latest
    steps:
      - name:   # arbitrary name of the first step
Steps shared by all three jobs
1. Cloning the repository to perform actions on it
Before any action can be performed on the files in your repository, it needs to be cloned on the runner, i.e. on the virtual machine. This is usually done via the action checkout.
- name: Checkout main
  uses: actions/checkout@v2
  with:
    path: main
- The
nameis once more arbitrary. - The
pathdirective clones the repo into the new foldermain. - If you want to use the workflow implementation on a private repo, you need to configure a bot token (see below).
- If you want to perform actions on a particular branch, you can use the
refdirective to checkout this branch (for an example, see the next section). When checking out a pull request,refreceives its HEAD which is stored in the system variable${{ github.event.pull_request.head.ref }}.
2. Installing the Python library ms3
The ms3 library provides the commands used
by this workflow implementation to parse MuseScore files and perform the
actions check, extract, and compare. Therefore it needs to be installed
on the runner. Instead of the latest version of the library (installable
via pip install ms3), this implementation uses a dedicated version which
lies in the branch workflow of the code repository.
The installation happens in the following three steps:
- name: Set up Python 3.8
  uses: actions/setup-python@v1
  with:
    python-version: 3.8
- name: Clone ms3
  uses: actions/checkout@v2
  with:
    repository: johentsch/ms3
    ref: workflow
    path: ./ms3
- name: Install ms3
  run: |
    python -m pip install --upgrade pip
    python -m pip install -e ./ms3
From here on, the commands of the ms3 library can be called.
3. Detecting which files were changed
In order to retrieve the files that were modified during a push or pull-request event, we use the pre-defined action get-changed-files:
- uses: lots0logs/gh-action-get-changed-files@2.1.4
  with:
    token: ${{ secrets.GITHUB_TOKEN }}
It stores the corresponding file paths in JSON files which can be passed on to the code that will perform tasks on them. In an additional step, we output the content of these JSON files, which can be useful for debugging.
- name: Display changed and added files
  run: |
    cat ${HOME}/files_modified.json
    cat ${HOME}/files_added.json
If we specify the ID ‘modified’ for the get-changed-files action, we can retrieve the same information using the variable etc.
4. Using a bot to push generated files to the repository
First we configure the general github-actions bot as the Git user and then
we can do a normal stage-commit-push:
- name: Push generated files
  working-directory: ./main
  continue-on-error: true
  run: |
    git config --global user.name "github-actions[bot]"
    git config --global user.email "41898282+github-actions[bot]@users.noreply.github.com"
    git add -A
    git commit -m "This is the bot's commit message"
    git push
working-directorymatches thepaththat we specified when cloning the repository (see above).continue-on-errorspecifies that this action should not figure as failed when no files were generated- Without further configuration, the
github-actionsbot works with public repositories only (for private ones, see below).
Commands used for performing the respective task
More details on the commands and their parameters can be found in
ms3’s documentation or, if you have
installed the library locally via pip install ms3, by calling the
respective command with the flag -h.
ms3 check
The command used to check the labels within all modified MSCX files is:
- name: Run ms3 check
  working-directory: ./main
  run: |
    ms3 check -f ${HOME}/files_modified.json --assertion
The --assertion flag causes the command to throw an error when it has
detected at least one syntactical mistake, deliberately causing the GitHub
action to fail. The mistakes are displayed in the corresponding error
message.
ms3 extract
This command is executed twice, namely for all modified and all added files:
- name: Run ms3 extract
  working-directory: ./main
  run: |
    ms3 extract -f ${HOME}/files_modified.json -M -N -X -D
    ms3 extract -f ${HOME}/files_added.json -M -N -X -D
The flags correspond to the following outputs and default values:
-M: store information on each measure under../measures-N: store information on each note under../notes-X: treat all annotations as DCML harmony labels, split them into feature columns, and store the information under../harmonies-D: extract metadata from the MuseScore files and update the filesmetadata.tsvandREADME.mdunder the current working directory.
You can change the directory names to your liking by simply passing a different
argument, e.g. -X ../expanded to store the files in the directory called
expanded lying next to the directory containing the MuseScore files. Note
that all stored TSV files have the same filename as their MSCX counterpart and
therefore need to be written to individual directories.
In case you are not using DCML harmony labels, you might be particularly interested in the option
-Lfor storing all labels under../annotations, or a different directory you specify.
ms3 compare
This command compares the annotations in the modified MuseScore files against
a TSV annotation table generated by ms3 extract with flag -X or -L.
- name: Run ms3 compare
  working-directory: ./main
  run: |
    ms3 compare -f ${HOME}/files_modified.json
By default, it looks for such a file in the relative folder ../harmonies.
If you are storing annotation tables under a different path, pass this path
as argument with the flag -a.
To give an example, say your MuseScore files are contained in the folder MS3
and you are extracting the contained labels to the folder labels, that is,
you are using the command ms3 extract -L ../labels, you would need to use
ms3 compare -a ../labels.
If no corresponding TSV file is found, for instance because new annotations
had not been merged into the main branch yet triggering ms3 extract,
the action won’t fail.
Configuring the workflow for private repositories
In order for the workflow to work with private repositories, you need to
have GitHub create and store a secret
which the checkout action and the bot can use. Secrets can grant
access to a single repository or to all repositories of an organization (only
organization admins can create the latter).
Say you have stored the secret under the name ACCESS_SECRET, you need to pass
it to the checkout action so it can clone the private repository:
- name: Clone repo
        uses: actions/checkout@v2
        with:
          path: main
          token: ${{ secrets.ACCESS_SECRET }}
To enable the bot to push to the private repo, you add a third line to its configuration:
git config --global user.name "github-actions[bot]"
git config --global user.email "41898282+github-actions[bot]@users.noreply.github.com"
git config --global user.token ${{ secrets.ACCESS_SECRET }}
Deploying automatic workflow updates from a central repository
If you are using the same workflow on many repositories and want to make sure that you won’t have to update them manually in case you change it, the recommended way might be organization-wide workflow templates. However, these used to be (or still are?) a Pro feature, so here is another way to do it.
For example, the DCML-specific workflow implementation lies in the repository
annotation_workflow_template.
which can be downloaded as a ZIP file using the URL
https://github.com/DCMLab/annotation_workflow_template/archive/refs/heads/main.zip.
So we have included in our extract.yml the following steps, after the
current repository has been cloned into the folder main and Git has been
configured to use the bot account:
- name: Pull current workflow
  working-directory: ./main
  run: |
    wget https://github.com/DCMLab/annotation_workflow_template/archive/refs/heads/main.zip
    unzip main.zip
    cp -r annotation_workflow_template-main/. .
    rm -r annotation_workflow_template-main/
    rm main.zip
- name: Push updated workflow
  working-directory: ./main
  continue-on-error: true
  run: |
    git add -A
    git commit -m "Updated version of workflows"
    git push
This downloads the ZIP file, unzips it, copies the content into the clone, and pushes the updated workflow in case it was changed. There are two disadvantages to this approach:
- In most cases, the steps are redundant.
- The updated workflow enters into effect only the next time an action is triggered, not during the current execution.
Known limitations
- The action
gh-action-get-changed-files@2.1.4sends HTTP requests for every commit contained in a pull request which causes anabuse detection mechanismerror when the number of commits approaches 200. An issue has been filed. - When you delete MuseScore files from the repository or rename them, they will
not be deleted from the
metadata.tsvnor from theREADME.md. - GitHub cannot handle MuseScore files > 50 MB (which are rare).
Bugs and issues
If you encounter unexpected errors or have trouble adapting the GitHub workflow to your needs, please describe your problem or question on this repository’s issue tracker.